Nutella-Filled Puff Pastry Christmas Tree Recipe
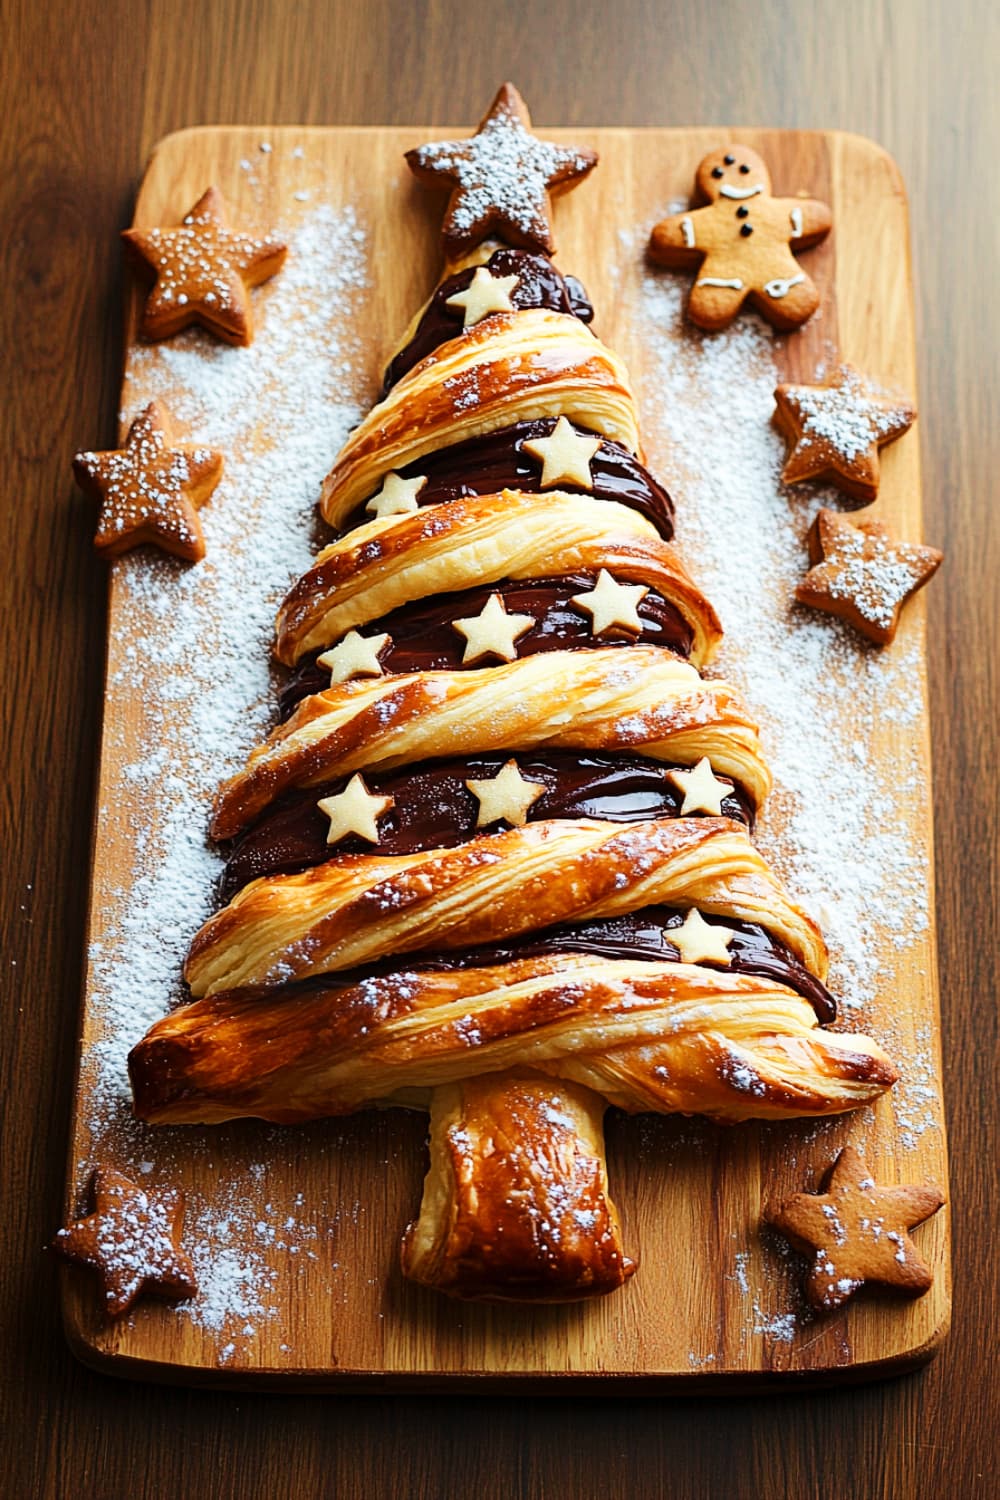
There’s something magical about pulling a warm, golden-brown Nutella-filled puff pastry out of the oven, especially when it’s shaped like a festive Christmas tree!
Whether you’re looking for an impressive holiday dessert or a simple treat for a cozy night in, this recipe checks all the boxes.
In just about 40 minutes and with only a handful of ingredients, you can create an elegant, flaky pastry filled with creamy Nutella. It’s the perfect balance of crisp layers and rich chocolate hazelnut filling, sure to wow guests and family alike.
And, the best part? It looks as good as it tastes—ideal for a show-stopping centerpiece at your next holiday gathering.
Why You’ll Love This Recipe:
- Simple & Elegant: With puff pastry and Nutella, you get a gourmet-looking dessert with minimal effort.
- Perfect for Entertaining: Shaped like a Christmas tree, it’s a fun, festive treat that’s sure to impress.
- Quick & Easy: From prep to plate, it’s ready in about 30 minutes, making it ideal for last-minute baking.
- Versatile: You can fill it with other spreads like cinnamon sugar or fruit preserves for a twist!
Nutella-Filled Puff Pastry Christmas Tree Recipe
Preparation Time: 20 minutes
Cooking Time: 15-20 minutes
Total Time: 35-40 minutes
Ingredients (Serves 4):
- 2 sheets of puff pastry (store-bought, thawed)
- Nutella or chocolate hazelnut spread – ¾ cup (or substitute with a dairy-free chocolate spread for a vegan option)
- 1 egg (for egg wash, substitute with plant-based milk for a vegan option)
- Powdered sugar – for dusting
- Optional decorations: Cookie stars or any holiday-themed edible decorations
Step-by-Step Instructions:
- Prepare the Puff Pastry:
-
- Preheat the oven to 375°F (190°C) and line a baking sheet with parchment paper.
- Roll out the puff pastry sheets onto a flat surface, ensuring they are both evenly sized. If necessary, lightly dust with flour to prevent sticking.
- Tip: If the puff pastry is too soft, refrigerate for a few minutes to firm it up, making it easier to handle.
- Cut the Christmas Tree Shape:
-
- Place one puff pastry sheet on the parchment paper and cut it into a large triangular Christmas tree bread shape, leaving a small rectangle at the bottom to form the tree’s trunk. Repeat the process with the second puff pastry sheet.
- Tip: Use a sharp knife or pizza cutter to ensure clean cuts, and don’t worry if the shape isn’t perfect – the twisting will cover it up.
- Add the Nutella Filling:
-
- Spread the Nutella generously over one of the pastry trees, leaving a ½ inch border around the edges. Place the second puff pastry tree over the Nutella-covered one, pressing gently around the edges to seal.
- Tip: If you’re avoiding dairy, substitute Nutella with a dairy-free chocolate hazelnut spread.
- Create the Tree Branches:
-
- Use a knife to cut horizontal “branches” on both sides of the tree, leaving the middle of the tree intact to keep the structure. Twist each branch 2-3 times to create the spiral effect, being careful not to tear the pastry.
- Tip: Twist the branches gently to avoid breaking the pastry. This twisting effect gives the Christmas tree pull-apart bread its signature look.
- Egg Wash and Bake:
-
- Whisk the egg (or use plant-based milk) and brush it over the pastry for a golden finish.
- Bake the tree in the preheated oven for 15-20 minutes, or until the pastry is puffed and golden brown.
- Tip: Keep an eye on the oven after 15 minutes, as baking times may vary based on the thickness of the pastry.
- Decorate and Serve:
-
- Once baked, allow the tree to cool for a few minutes before decorating. Dust with powdered sugar for a snowy effect, and add cookie stars or other edible holiday decorations for a festive flair.
- Tip: You can use star-shaped cookies to top the tree for an extra decorative touch, or add some holiday-themed sprinkles.
Notes to Remember:
- Allergen Substitutes: For a gluten-free version, use gluten-free puff pastry sheets. Dairy-free and vegan substitutes can be used for the Nutella and egg wash.
- Serving Tip: Serve this tree warm for the best taste and texture. The melted Nutella combined with the flaky pastry makes for a delicious treat.
- Storage: If you have leftovers, store them in an airtight container at room temperature for up to 2 days. Reheat in the oven for a crisp finish.
- Presentation: For an extra special look, add small edible stars or festive decorations around the tree and make it the centerpiece of your Christmas dinner recipes.
Clarifications and Additional Tips:
- Twisting the Branches:
-
- When twisting the “branches” of the Christmas tree, ensure you twist them gently but tightly enough so they hold their shape during baking. Too loose, and they may unravel; too tight, and they may tear.
- Tip: To prevent tearing, don’t overfill with Nutella near the edges of the branches.
- Nutella Spreading:
-
- While spreading Nutella, make sure to leave a ½ inch border around the edge of the puff pastry so it doesn’t spill out while baking. This will also make sealing the two pastry sheets easier.
- Tip: If Nutella is too thick to spread easily, warm it slightly to achieve a smoother spread.
- Puff Pastry Size:
-
- Ensure both puff pastry sheets are of the same size and thickness. If one sheet is slightly smaller, it may cause uneven baking.
- Tip: Gently roll out the pastry if it seems too thick, keeping the thickness consistent for even baking.
- Baking Time:
-
- The baking time might vary based on how thick the puff pastry is. Ensure you check the tree after 15 minutes. You’re looking for a golden-brown color. If it’s still too pale, bake for an additional 5 minutes while monitoring to prevent burning.
Garnishing & Decoration Options:
- Dusting of Powdered Sugar:
-
- A light dusting of powdered sugar mimics snow and enhances the festive feel of the Christmas tree. Make sure to do this once the tree has cooled slightly, as powdered sugar can melt on warm pastry.
- Festive Cookie Decorations:
-
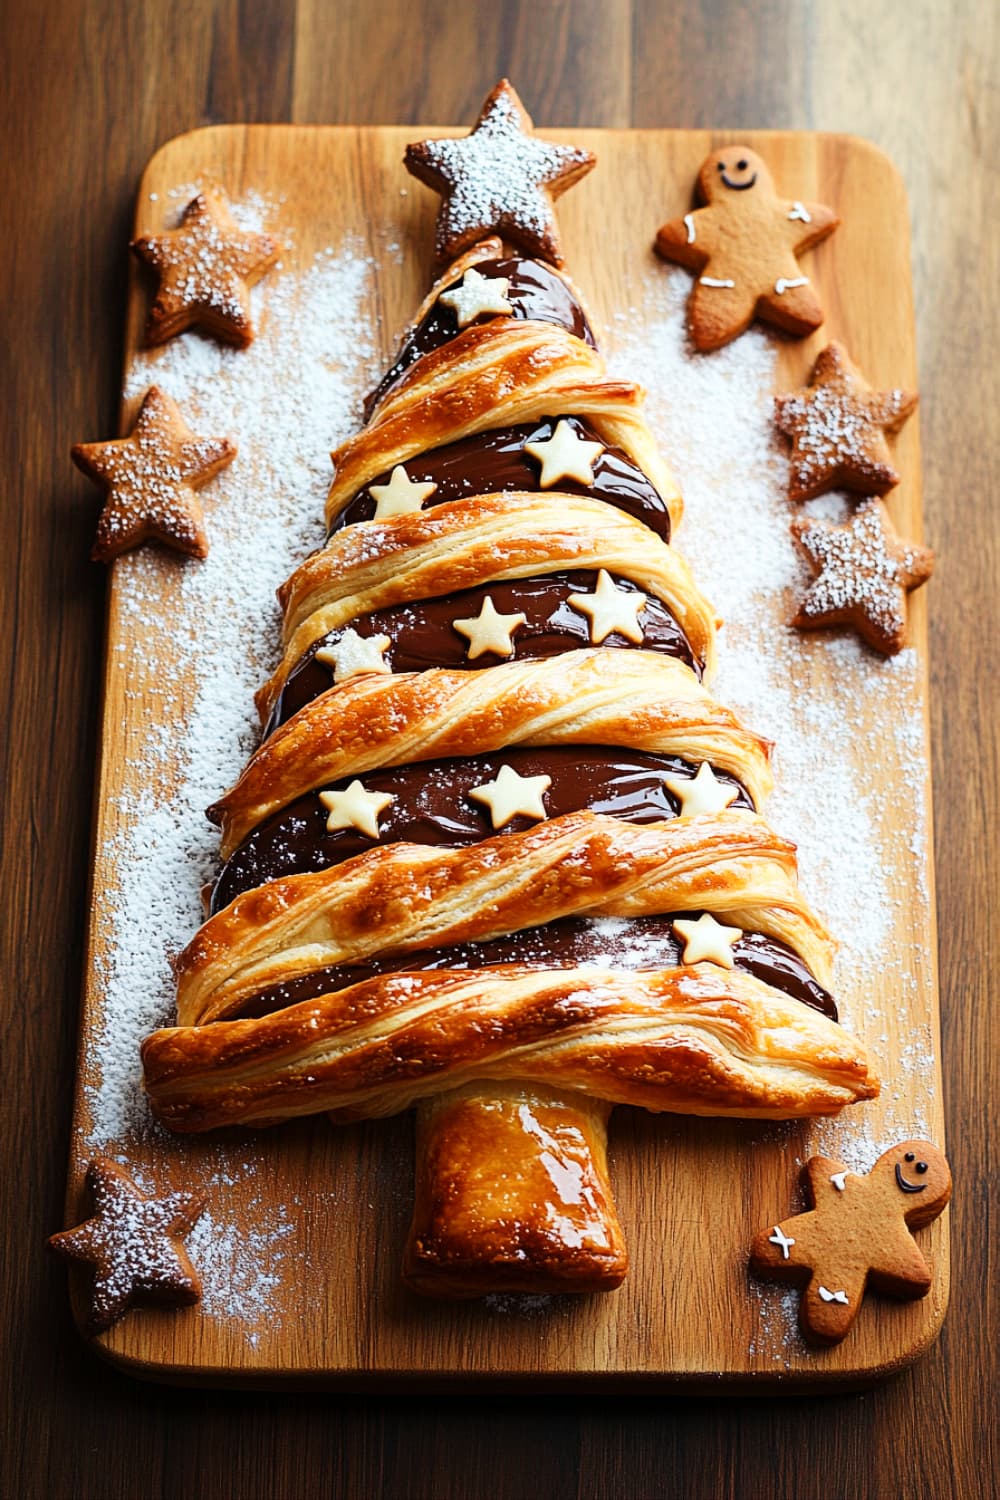
- Use small star-shaped cookies, as shown in the image, to create decorations for the tree. You can attach these cookies to the puff pastry tree using a dab of melted chocolate or Nutella.
- Tip: Pre-bake these cookies before adding them to the tree.
- Fruit Garnishes:
-
- Add a fresh touch by decorating with small pieces of fruit like raspberries or halved cherries for a pop of color. This pairs well with the richness of the Nutella.
- Tip: Add the fruit only after baking to avoid sogginess.
- Festive Colored Drizzle:
-
- Melt some white chocolate and color it with green or red food coloring to drizzle over the tree in decorative stripes. It adds more color and enhances the holiday theme.
- Tip: If using food coloring, make sure it’s oil-based to prevent seizing the chocolate.
- Nuts or Crushed Candy Canes:
-
- For extra crunch, sprinkle crushed candy canes or finely chopped nuts like almonds or pistachios over the tree right after baking while the pastry is still warm. The nuts or candy canes will stick to the melted Nutella and add both flavor and texture.
- Gingerbread Men or Mini Sugar Cookies:
-
- Create mini gingerbread men or star-shaped sugar cookies to place around the tree, as shown in the image. This will create a full Christmas scene and make the whole setup look more festive.
Final Notes:
- Cooling Time: Allow the tree to cool slightly before serving. Serving it too hot might cause the Nutella to be overly runny, but letting it sit for a few minutes will allow the Nutella to settle without becoming too firm.
- Nut-Free Alternative: For those with nut allergies, you can substitute Nutella with a chocolate spread that doesn’t contain nuts, like a dairy-free chocolate spread.
- Storage: If you’re not serving the pastry immediately, store it in a loosely covered container at room temperature. To reheat, place it back in the oven at a low temperature for a few minutes to refresh the crispiness.
Tips on how to cut the bread in the tree and star-shape
1. Start with Two Puff Pastry Sheets of Equal Size
- Ensure Both Sheets Match: Begin by ensuring that both puff pastry sheets are of the same size. Lay them on top of each other before cutting to confirm that they are aligned. This will make it easier to cut identical shapes for both layers.
- Tip: If one sheet is slightly smaller, gently roll it out to match the size of the other sheet.
2. Cutting the Christmas Tree Shape
- Create a Basic Triangle: Using a sharp knife or pizza cutter, cut the puff pastry into a large triangle. The easiest way is to visualize the tree by cutting from the top center of the sheet down to the bottom corners of the pastry, forming an isosceles triangle (with the two sides equal in length).
- Leave a small rectangle at the bottom to represent the trunk.
- Symmetry is Key: Try to make the sides of the triangle as straight and even as possible. Symmetry will help give the tree a more polished look.
Tips for the Tree Shape:
- Outline Before Cutting: If you’re nervous about making the cuts freehand, lightly score the shape with a knife before making the final cuts. This way, you can adjust if needed before committing to the cut.
- Use a Ruler or Straightedge: If you want the tree to be perfectly even, you can use a ruler or any straight-edge tool to guide your cuts. This ensures that your Christmas tree shape is precise.
3. Twisting the Branches
- Cut the Tree Branches: After you’ve cut your triangular tree, make horizontal cuts along both sides of the triangle to create the branches. Leave the middle (the “trunk” of the tree) intact so the tree holds its shape. Each branch should be about 1-1.5 inches wide.
- Twist Each Branch: Once the branches are cut, gently twist them 2-3 times. The twisting adds a beautiful texture to the tree and exposes the Nutella filling. Be careful not to over-twist or stretch the branches too much, as this can cause them to break.
Tips for Twisting:
- Uniform Twists: Make sure each branch is twisted in the same direction (either all clockwise or counterclockwise) for a more uniform and aesthetically pleasing look.
- Avoid Overfilling the Edges: When applying the Nutella, keep it away from the edges of the branches to prevent it from spilling out during the twisting process.
4. Cutting the Star
- Use a Star Cookie Cutter: The star at the top of the tree can be easily made by using a small star-shaped cookie cutter. If you don’t have one, you can create your own by cutting a star shape with a sharp knife.
- Star Thickness: Use leftover puff pastry scraps to create the star. Ensure it’s not too thick or it won’t puff up properly when baked.
Tips for Perfect Stars:
- Chill the Dough: If the pastry becomes too soft after shaping the stars, refrigerate the cut-out stars for about 10 minutes before baking. This helps the stars keep their shape.
- Position the Star Carefully: Place the star on top of the tree (or near it) before baking, but make sure it is centered and doesn’t shift during baking.
5. Add Extra Stars for a Festive Look
- Create Mini Stars: In the image, smaller stars are scattered around the tree. You can use mini star cutters to create multiple small stars from the puff pastry scraps. Place them randomly on the tree for a more decorative look.
- Tip: Dust these stars with powdered sugar after baking for a festive snowy effect.
6. Final Shaping and Adjustments
- Reshape If Necessary: Before baking, take a moment to adjust the shape of the tree if it has shifted or become uneven while cutting and twisting. You can gently press the edges to straighten the tree if needed.
- Clean Cuts for the Trunk: Make sure the rectangle at the bottom (the trunk) is neat and defined. It should be thicker than the branches for added stability.
7. Additional Finishing Touches
- Egg Wash for a Golden Finish: Brush the entire tree with egg wash (or plant-based milk for a vegan option) to achieve the golden-brown finish you see in the image.
- Ensure Even Baking: Watch the tree closely while baking. Puff pastry can be baked quickly, so once it’s golden brown, it’s ready. If parts of the tree are browning faster than others, cover them lightly with foil and continue baking.
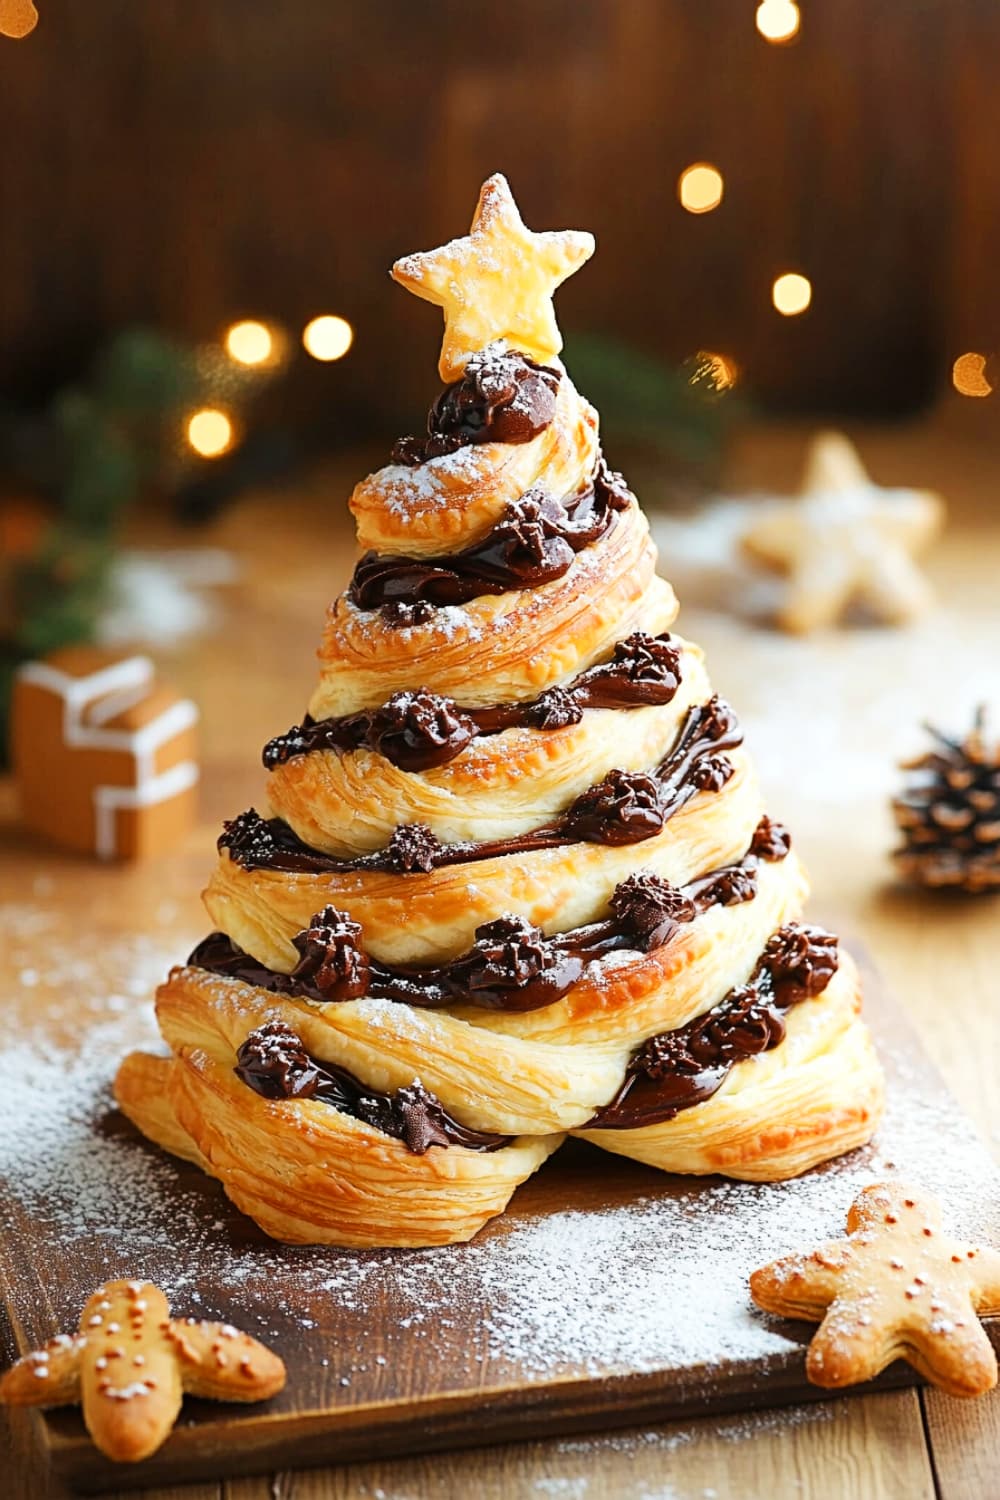
Tips To make your Nutella-Filled Puff Pastry Christmas Tree stand up Vertically
If you want to make your tree stand vertically instead of keeping it lying horizontally you will need to make the following adjustments:
1. Shape the Dough for Stability:
- Cut the dough into strips: Use puff pastry and cut it into long, even strips. As you shape the tree, ensure that the base (bottom layer) is larger and wide enough to support the rest of the layers.
- Twist the strips: Gently twist the strips into spirals to create a sturdy tree-like structure. Start with a larger circle at the bottom and reduce the size of each layer as you go up.
2. Layering and Filling:
- Nutella filling: Spread Nutella on the pastry strips, ensuring it’s evenly distributed but not too thick, which could make the tree unstable.
- Stack carefully: After twisting each strip, stack them on top of each other, aligning the layers slightly inward to create the tree shape. Use a small star-shaped puff pastry at the top for decoration.
3. Support with a Skewer:
- Insert a skewer: To keep the tree standing straight, insert a skewer or toothpick through the middle of the entire pastry structure. This will provide additional support while baking and ensure the layers stay together.
4. Baking for Structure:
- Bake until golden brown: Baking puff pastry properly is key. Ensure that the layers are fully baked and golden so they can support the structure when cool. You can bake the tree in sections if it’s too large to handle all at once. And there is no point in adding the stem portion as it will get hidden in the vertical version.
5. Use a Cone or Mold:
- Create a foil cone for extra stability: If you want to ensure extra support, you can form a cone out of aluminum foil and use it as a mold inside the tree structure. Wrap the puff pastry around the cone and bake it with the foil in place. Once baked and cooled, carefully remove the foil, leaving a hollow but stable tree structure.
6. Final Assembly, Cooling and Handling:
- Allow proper cooling: Once baked, let the tree cool completely before moving it. This will allow the puff pastry to fully set and be strong enough to stand without collapsing. Handle it carefully to maintain its shape during decoration and serving.
- Once the pastry is baked and cooled, gently remove the skewer if used. Decorate the tree with powdered sugar for a snowy effect
Mistakes To Avoid While Making Nutella-Filled Puff Pastry Christmas Tree
- Ingredient Selection:
-
- Common Mistake: Using low-quality puff pastry or Nutella substitutes can affect texture and flavor.
- How to Avoid: Use high-quality puff pastry and Nutella for the best results. Opt for dairy-free versions if needed.
- Preparation Pitfalls:
-
- Common Mistake: Overfilling the pastry with Nutella can lead to leaks.
- How to Avoid: Leave a border around the edges when spreading Nutella to prevent overflow.
- Cooking Techniques:
-
- Common Mistake: Over-twisting or cutting uneven branches can cause tearing.
- How to Avoid: Gently twist the branches and ensure even cuts for a balanced appearance.
- Seasoning and Flavoring:
-
- Common Mistake: Under-seasoning (not adding any finishing flavor).
- How to Avoid: Dust the tree with powdered sugar or drizzle melted chocolate for extra flavor and decoration.
- Presentation Tips:
-
- Common Mistake: Not chilling the puff pastry before baking can lead to a misshapen tree.
- How to Avoid: If the pastry becomes too warm while working with it, refrigerate for a few minutes before baking.
Pairing Suggestions & Seasonal Variations for Nutella-Filled Puff Pastry Christmas Tree
- Pairing Suggestions:
-
- Beverages: Pair with hot chocolate, spiced apple cider, or mulled wine for a cozy winter treat.
- Side Dishes: Serve alongside fresh fruit or a light fruit compote to balance the richness of the Nutella.
- Seasonal Variations:
-
- Spring/Summer: For a summer variation, swap Nutella for fruit jam or lemon curd and sprinkle with fresh berries.
- Autumn/Winter: Add cinnamon or nutmeg to the Nutella spread for a warm, spiced twist perfect for the colder months.
- Fun Facts:
-
- This tree-shaped pastry is inspired by classic French “Tarte Soleil,” but with a festive twist to resemble a Christmas tree.
- It’s not only delicious but also interactive—perfect for pulling apart and sharing during holiday gatherings.
Professional Tips for Making Nutella-Filled Puff Pastry Christmas Tree
- Pro Tips:
- Use High-Quality Puff Pastry: Not all puff pastry is created equal. To achieve the flakiest, crispiest results, opt for an all-butter puff pastry (or a vegan equivalent if needed). This will give your Christmas tree bread that irresistible golden, flaky finish.
- Chill Your Dough: If the puff pastry becomes too soft while working with it, chill it in the fridge for about 10 minutes. This will make cutting and twisting the “branches” easier, resulting in a cleaner and more defined shape.
- Create Even Branches: When cutting the tree’s branches, make sure they are of equal size. This ensures even baking and a balanced presentation. Use a ruler if needed to measure the width of each branch.
- Prevent Leaks: To avoid Nutella leaking out during baking, leave a ½ inch border around the edges and press the edges gently to seal. You can even lightly brush water around the edges to help the pastry stick.
- Brush with Egg Wash Last: Apply the egg wash right before baking for a beautiful, golden sheen. Be careful not to brush too much around the edges, as it can cause the pastry to seal less effectively.
- Decoration Elevates the Dish: Consider adding festive decorations like edible glitter or mini star-shaped cookies to create visual interest. These touches make the dish more appealing and perfect for showcasing on social media or at a Christmas dinner party.
FAQs for Nutella-Filled Puff Pastry Christmas Tree
- Q: Can I use a different filling instead of Nutella?
A: Absolutely! You can substitute Nutella with any chocolate spread, fruit jams, or even a cinnamon-sugar mix for a different flavor profile. Just ensure the filling isn’t too watery, as this can make the pastry soggy. - Q: Can I make this ahead of time?
A: Yes, you can assemble the Christmas tree and refrigerate it (covered) for up to 12 hours before baking. Just make sure to brush the egg wash on right before baking. - Q: How do I store leftovers?
A: Store leftovers in an airtight container at room temperature for up to 2 days. To re-crisp the pastry, reheat in the oven at 300°F (150°C) for 5-7 minutes. Avoid the microwave, as it will make the pastry soggy. - Q: Can I freeze the pastry?
A: Yes! You can freeze the unbaked tree after assembling it. Wrap it tightly in plastic wrap and store in a freezer-safe bag for up to 1 month. Bake from frozen, adding an additional 5-10 minutes to the baking time. - Q: Can I use homemade puff pastry?
A: Definitely! Homemade puff pastry will elevate the flavor and texture of the dish even further. Just ensure it’s rolled out evenly and thin enough to create light, flaky layers. - Q: Can I make this gluten-free?
A: Yes, you can use gluten-free puff pastry to make this dish suitable for those with gluten intolerances. Ensure that the gluten-free pastry is rolled out evenly for the best texture.
Closing Thoughts
This Nutella-Filled Puff Pastry Christmas Tree is a delightful and easy holiday treat that will brighten up any festive gathering.
Its visually stunning shape, paired with the delicious combination of flaky pastry and rich Nutella, makes it a crowd favorite. I hope this recipe brings as much joy to your kitchen as it does to your table.
I’d love to hear how your Christmas tree turns out—whether you tried a different filling, added a unique decoration, or have any creative tips of your own!
Please share your experience in the comments below or tag me on social media. Your feedback and variations are always welcome.
Happy baking and enjoy this festive season with your loved ones!

Nutella-Filled Puff Pastry Christmas Tree
Ingredients
- 2 sheets puff pastry thawed
- ¾ cup Nutella or chocolate hazelnut spread dairy-free version available
- 1 egg for egg wash, substitute with plant-based milk for vegan option
- Powdered sugar for dusting
- Optional: Cookie stars edible glitter, or small holiday-themed decorations
Instructions
- Preheat Oven: Set to 375°F (190°C) and line a baking sheet with parchment paper.
- Cut the Christmas Tree Shape: Cut both puff pastry sheets into a large tree shape with a small rectangular trunk. Ensure both sheets are the same size.
- Spread Nutella: On one tree, spread Nutella, leaving a ½ inch border around the edges. Place the second tree on top, pressing the edges to seal.
- Create Branches: Cut horizontal "branches" on both sides of the tree, leaving the middle intact. Twist each branch 2-3 times.
- Egg Wash & Bake: Brush the tree with the egg wash and bake for 15-20 minutes until golden brown.
- Decorate & Serve: Once baked, dust with powdered sugar and add any holiday decorations before serving.

