The Only Red Velvet Brownie Poke Cake Recipe You’ll Ever Need

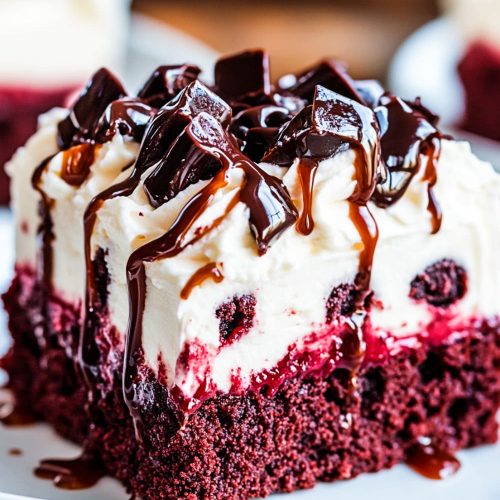
Have you ever had one of those moments when you’re craving something rich, chocolatey, and just a little bit indulgent? Well, I’ve got the perfect solution for you—this Red Velvet Brownie Cake Recipe!
In just 60 minutes, and with a few simple, but oh-so-satisfying ingredients, you can create a dessert masterpiece right in your kitchen (think moist red velvet, fudgy brownies, and a swirl of cream cheese goodness).
This recipe combines everything you love about Velvet Cake Recipes and Red Velvet Brownies in one easy, drool-worthy creation.
In this guide, I’ll show you step-by-step how to whip up this Red Velvet Poke Cake so you can impress your friends and family with minimal effort. Whether you’re making it for a holiday gathering or just treating yourself, you’re going to love every bite.
Why You’ll Love This Recipe:
- Easy to make—minimal effort, maximum payoff.
- Fudgy and rich—combines the best of both brownies and red velvet cake.
- Perfect for any occasion—from family dinners to special celebrations.
- Creamy topping—the cream cheese poke cake filling takes it to the next level!
Red Velvet Brownie Cake Recipe
- Preparation Time: 20 minutes
- Cooking Time: 40 minutes
- Total Time: 1 hour
- Serves: 4
Ingredients:
For the Brownie Base:
- 1/2 cup (115g) unsalted butter, melted
- Dairy-free option: Use coconut oil or dairy-free margarine.
- 1 cup (200g) granulated sugar
- 2 large eggs
- Egg-free option: Use flaxseed egg (1 tbsp ground flaxseed + 3 tbsp water per egg).
- 1 tsp vanilla extract
- 2 tbsp red food coloring
- 1/3 cup (30g) cocoa powder, unsweetened
- 1/2 cup (60g) all-purpose flour
- Gluten-free option: Use gluten-free all-purpose flour.
- 1/4 tsp salt
- 1/4 tsp baking powder
For the Cream Cheese Topping:
- 8 oz (225g) cream cheese, softened
- Dairy-free option: Use dairy-free cream cheese.
- 1/2 cup (115g) unsalted butter, softened
- 2 cups (240g) powdered sugar
- 1 tsp vanilla extract
For the Drizzle:
- 1/2 cup (115g) dark chocolate, melted
- 2 tbsp caramel sauce (optional)
Instructions:
Step 1: Make the Brownie Base
- Preheat the oven to 350°F (175°C). Grease and line an 8×8-inch baking pan with parchment paper.
- Mix the wet ingredients: In a medium bowl, combine the melted butter and sugar. Whisk in the eggs, vanilla extract, and red food coloring until well combined. Tip: Whisk the eggs well to incorporate air, which will give the brownies a slightly lighter texture.
- Combine the dry ingredients: In another bowl, sift together the cocoa powder, flour, salt, and baking powder. Gradually fold the dry ingredients into the wet ingredients until just combined. Tip: Be careful not to overmix—overmixing can lead to dense brownies.
- Bake: Pour the batter into the prepared pan and smooth the top. Bake for 30-35 minutes, or until a toothpick inserted into the center comes out with moist crumbs. Tip: Keep an eye on the baking time for a perfect Red Velvet Fudge Brownie Cake—you don’t want to overbake.
Step 2: Prepare the Cream Cheese Topping
- Beat the cream cheese and butter: In a large bowl, use a hand mixer or stand mixer to beat the softened cream cheese and butter together until light and fluffy.
- Add the powdered sugar: Gradually add the powdered sugar, beating on low speed. Once combined, add the vanilla extract and beat on high speed until smooth and creamy. Tip: If the frosting is too thick, add a tablespoon of milk or cream to reach the desired consistency.
Step 3: Assemble the Cake
- Poke the cake: Once the brownies have cooled slightly, use the end of a wooden spoon to poke holes evenly across the surface of the brownie base. Pour half of the cream cheese mixture into the holes.
- Frost the brownies: Spread the remaining cream cheese frosting evenly across the top of the brownie base.
Step 4: Drizzle and Decorate
- Drizzle the melted chocolate: Gently drizzle melted dark chocolate over the frosted cake. You can also add a drizzle of caramel sauce for extra richness.
- Chill and serve: Refrigerate the cake for 1 hour before serving to allow the flavors to set. Once chilled, cut into squares and serve your Red Velvet Brownie Layer Cake.
Notes to Remember:
- Cooling is key: Let the brownies cool for at least 20-30 minutes before frosting or the frosting will melt.
- Frosting texture: If you prefer a lighter texture, use whipped cream cheese frosting.
- Storage: Keep the cake refrigerated in an airtight container for up to 4 days.

Garnishing & Decoration Options:
- Chocolate & Caramel Drizzle:
-
- Use a generous drizzle of dark chocolate and caramel sauce on top of the cream cheese frosting for added richness. This not only looks beautiful but enhances the overall flavor.
- Crumbled Brownie Pieces:
-
- For a visually striking look, crumble some of the extra brownies (or even edges if they’re slightly overbaked) and sprinkle them on top of the frosted cake. It adds texture and creates a nice contrast.
- Fresh Berries:
-
- Garnish the cake with fresh raspberries or strawberries. The bright red color complements the red velvet cake and adds a fresh, juicy element to each bite.
- Nutty Crunch:
-
- Add crushed pecans or walnuts around the edges or over the frosting for an added crunch. This works well for those who love a balance of textures in their desserts.
- Whipped Cream Swirls:
-
- Pipe some whipped cream swirls on top of the brownies for an elegant touch. This pairs beautifully with the rich, dense cake.
- Shaved Chocolate:
-
- For a simple but effective garnish, top with chocolate shavings or curls. Use a vegetable peeler to create thin chocolate ribbons from a dark chocolate bar.
Mistakes to Avoid While Making Red Velvet Brownie Cake
When making Red Velvet Brownie Cake, it’s important to avoid common mistakes that can affect the taste, texture, or appearance of the dish. Here’s a guide to ensure you create the best possible result, avoiding pitfalls along the way.
1. Ingredient Selection:
- Low-quality cocoa powder: Using low-quality cocoa can result in a less flavorful Red Velvet Brownie base. Opt for high-quality unsweetened cocoa for rich, bold flavor.
- Incorrect food coloring: Be sure to use gel food coloring instead of liquid to achieve the perfect deep red hue for your Red Desserts. Liquid food coloring can water down your batter and alter the texture.
- Skipping fresh cream cheese: Using subpar or expired cream cheese for your Cream Cheese Poke Cake frosting will affect the overall flavor and texture. Fresh ingredients make all the difference in Velvet Desserts.
2. Preparation Pitfalls:
- Overmixing the batter: Overmixing will result in dense and tough Red Velvet Cake Brownies. Once the dry ingredients are combined with the wet, mix until just incorporated.
- Not cooling the brownies properly: It’s essential to let the brownies cool completely before frosting. Frosting warm brownies will cause the cream cheese to melt, ruining your presentation.
3. Cooking Techniques:
- Incorrect oven temperature: Make sure your oven is fully preheated to 350°F (175°C) before baking. Baking in an unevenly heated oven can cause undercooked or overbaked edges.
- Overbaking: Keep an eye on the brownies after the 30-minute mark. You want them to be fudgy, so remove them when a toothpick comes out with a few moist crumbs. Overbaking will lead to a dry, crumbly texture rather than a Velvety Brownie Cake.
4. Seasoning and Flavoring:
- Too much vanilla: While vanilla is essential for flavor balance, don’t overdo it. Too much vanilla can overpower the rich cocoa flavor of your Red Velvet Fudge Brownie Cake.
- Forgetting salt: A pinch of salt is crucial in bringing out the sweetness and enhancing the chocolate flavor in your brownies. Don’t skip it!
5. Presentation Tips:
- Not smoothing the frosting: When applying the cream cheese frosting, take your time to smooth it evenly over the brownies for a professional finish. This also helps ensure an even drizzle when adding chocolate.
- Hasty cutting: Allow the brownies to chill after frosting before cutting them into squares. This will help keep the edges clean and give you perfect portions.

Pairing Suggestions and Seasonal Variation
Pairing Suggestions:
- Beverages: Pair these decadent Red Velvet Brownie Cake slices with a hot cup of coffee or a frothy cappuccino. For a more indulgent experience, serve with a chilled glass of milk or a creamy hot chocolate.
- Side Dishes: Complement this rich dessert with a light fruit salad featuring berries, or serve it alongside vanilla bean ice cream for a refreshing contrast.
- Dessert Spread: This Red Velvet Brownie Layer Cake is perfect on a dessert table next to Cream Cheese Poke Cake or other Velvet Desserts like red velvet cupcakes or cookies.
Seasonal Variation:
- Spring/Summer: For warmer months, you can replace the cream cheese frosting with a lighter whipped cream topping and fresh raspberries for a refreshing twist.
- Fall/Winter: Keep it rich for the colder months by adding spices like cinnamon or nutmeg to the brownie batter. Top with caramel drizzle for a cozy, seasonal variation.
Pro Tips:
- Use room temperature ingredients: To achieve a smooth batter and frosting, make sure your eggs, butter, and cream cheese are at room temperature. This ensures everything blends evenly without lumps.
- Chill the frosting: If you want your cream cheese frosting to pipe beautifully, chill it for 10-15 minutes before spreading it over the brownies. This gives it a firmer consistency.
- Poke holes while brownies are warm: For the best results with your Red Velvet Poke Cake, poke the holes while the brownies are still warm to help the frosting soak in better.
FAQs:
Q1: Can I make these brownies gluten-free?
Yes, substitute all-purpose flour with a gluten-free flour blend, and your Red Velvet Brownies will still be delicious and fudgy.
Q2: Can I make the frosting in advance?
Absolutely! You can prepare the cream cheese frosting up to two days in advance. Store it in an airtight container in the fridge, and give it a quick mix before spreading it on your brownies.
Q3: How long can I store these brownies?
These brownies can be stored in an airtight container in the refrigerator for up to 5 days. For longer storage, freeze them for up to 3 months. Just thaw them in the fridge before serving.
Q4: Can I use a boxed red velvet cake mix for this recipe?
If you’re short on time, you can use a red velvet cake mix, but homemade Red Velvet Brownies give you that dense, fudgy texture that boxed mixes might not provide.
Closing Thoughts
This Red Velvet Brownie Cake Recipe brings together the best of both worlds—brownies and red velvet cake! It’s the perfect dessert for any occasion, whether you’re celebrating a birthday, Valentine’s Day, or simply indulging in a sweet treat at home.
We’d love to hear how your Red Velvet Fudge Brownie Cake turned out! Share your variations and tips in the comments below, or tag us on social media with your creation. Happy baking, and don’t forget to enjoy every rich, chocolatey bite!
Red Velvet Brownie Cake Recipe
Ingredients
Brownie Base:
- Butter sugar
- eggs
- vanilla extract
- red food coloring
- cocoa powder
- flour salt
- baking powder
Cream Cheese Topping:
- Cream cheese
- butter
- powdered sugar
- vanilla extract
Drizzle:
- Dark chocolate
- caramel sauce
Instructions
- Preheat oven to 350°F (175°C). Grease and line an 8x8-inch baking pan.
- Prepare the brownie batter by mixing wet and dry ingredients separately, then combine.
- Pour into the pan and bake for 30-35 minutes.
- Beat the cream cheese and butter until fluffy, then add powdered sugar and vanilla. Spread over the cooled brownie base.
- Poke holes in the brownies and fill with frosting.
- Drizzle with melted chocolate. Chill before serving.

