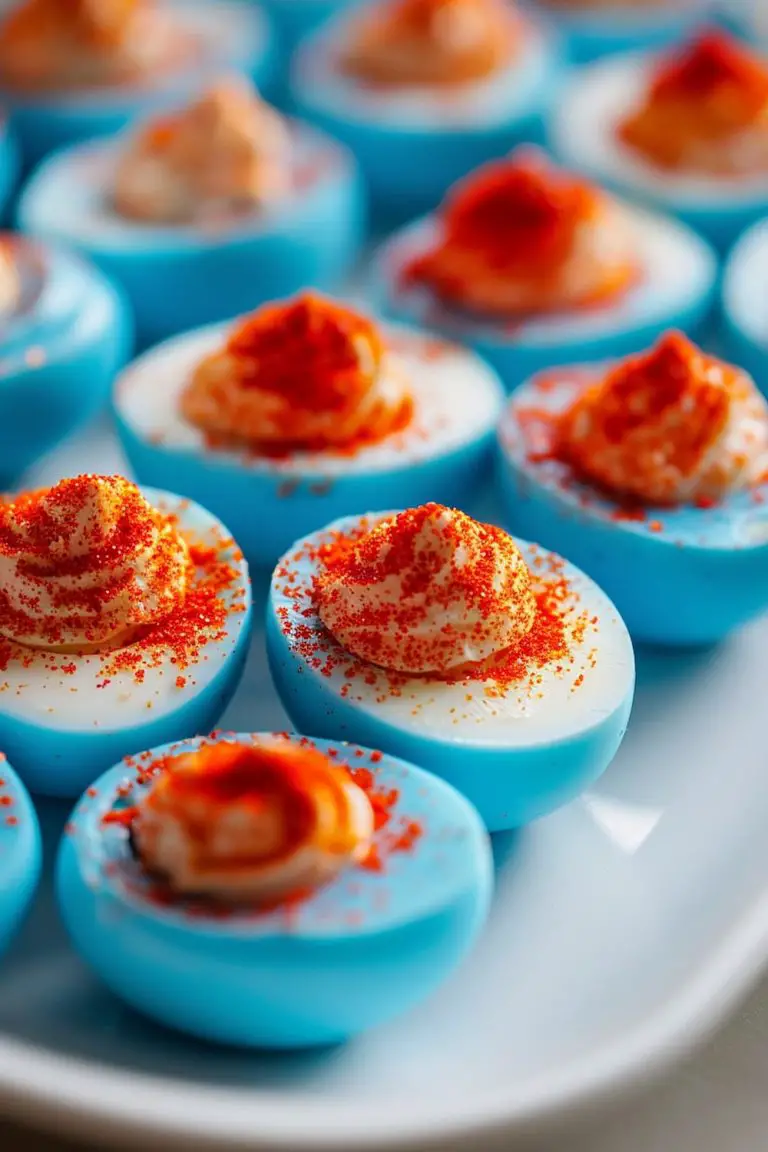
18 Sweet Valentine’s Day Dessert Ideas That Will Steal Your Heart

Are you ready to wow your loved ones with desserts they’ll talk about long after Valentine’s Day is over?
Imagine surprising your partner with homemade Strawberry Filled Chocolates or sharing Valentine Tea alongside delicious Puff Pastry Hearts.
The best part? These recipes are not only easy to make but designed to spark joy and create memories. This list of Valentine’s Bakes for Kids, charming Pink Truffles Recipes, and decadent DIY Valentine Chocolates will give you all the inspiration you need to craft that perfect dessert spread.
Why You’ll Love This Recipe List:
- Simple-to-make recipes that deliver big on flavor.
- Creative ideas like Easy Bonbon Recipes, Raspberry Filled Chocolate Bites, and more.
- Desserts that are not just delicious but perfect for showing love on Valentine’s Day.
- Don’t miss out on these creative ways to elevate your dessert game and impress everyone at your table!
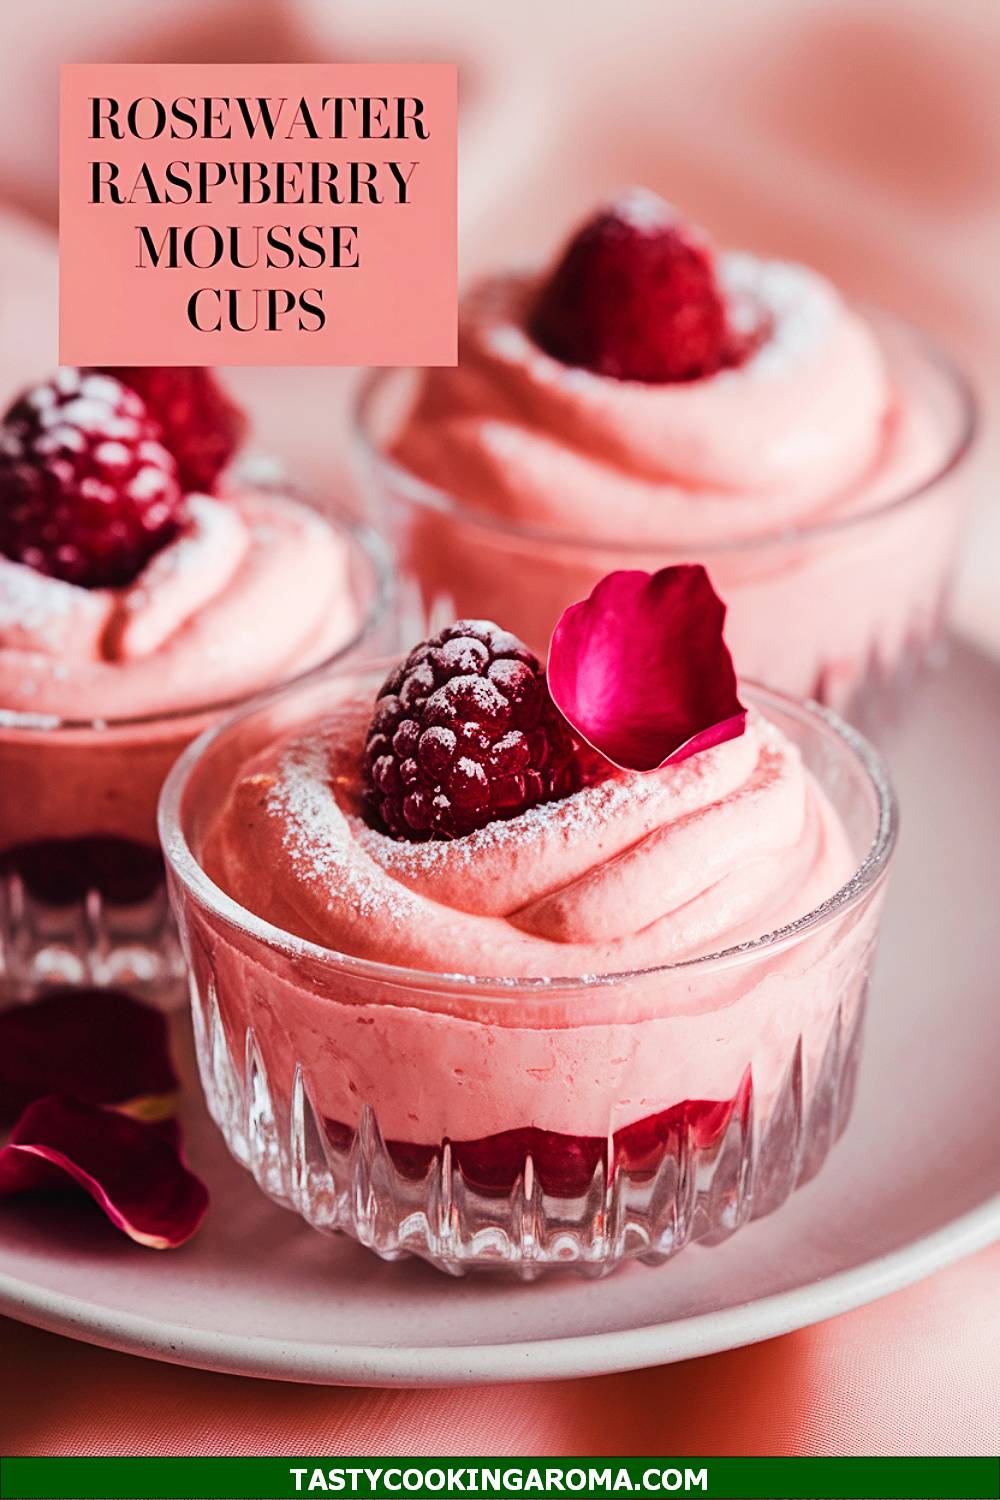
Rosewater Raspberry Mousse Cups
These Rosewater Raspberry Mousse Cups are as elegant as they are delicious! The creamy mousse, infused with a hint of rosewater, pairs beautifully with the tangy raspberry flavor. They’re light, airy, and perfect for a romantic Valentine’s Day treat. Plus, serving them in individual cups makes them look so fancy yet super easy to assemble.
Serving Size: 4 servings
Time Needed: 20 minutes (plus chilling time)
Ingredients
- 1 cup fresh raspberries (plus extra for garnish)
- 1 cup heavy whipping cream
- 2 tablespoons powdered sugar
- 1 teaspoon rosewater
- 1 teaspoon vanilla extract
- Optional: crushed pistachios for garnish
Instructions
- In a large mixing bowl, whip the heavy cream, powdered sugar, vanilla extract, and rosewater until soft peaks form. Be careful not to overwhip!
- In a blender, purée the fresh raspberries until smooth. Strain the mixture through a fine mesh sieve to remove seeds.
- Gently fold the raspberry purée into the whipped cream mixture until fully combined and fluffy.
- Spoon the mousse into individual serving cups and refrigerate for at least 2 hours to set.
- Before serving, garnish with fresh raspberries and a sprinkle of crushed pistachios, if desired.
Quick Pros of the Recipe
- Light and refreshing dessert with a floral twist.
- Perfect for make-ahead preparation.
- Uses simple ingredients that are easy to find.
- Beautiful presentation in individual cups.
Ingredient Substitutions or Customization Ideas: Swap rosewater with orange blossom water for a citrusy twist, or use blueberries instead of raspberries for a different berry flavor. For a dairy-free option, use coconut cream instead of heavy cream.
Cooking Tips and Tricks: Chill your mixing bowl and whisk for about 15 minutes before whipping the cream—it’ll whip up faster and hold its shape better. For extra sweetness, drizzle a little honey on top before serving.
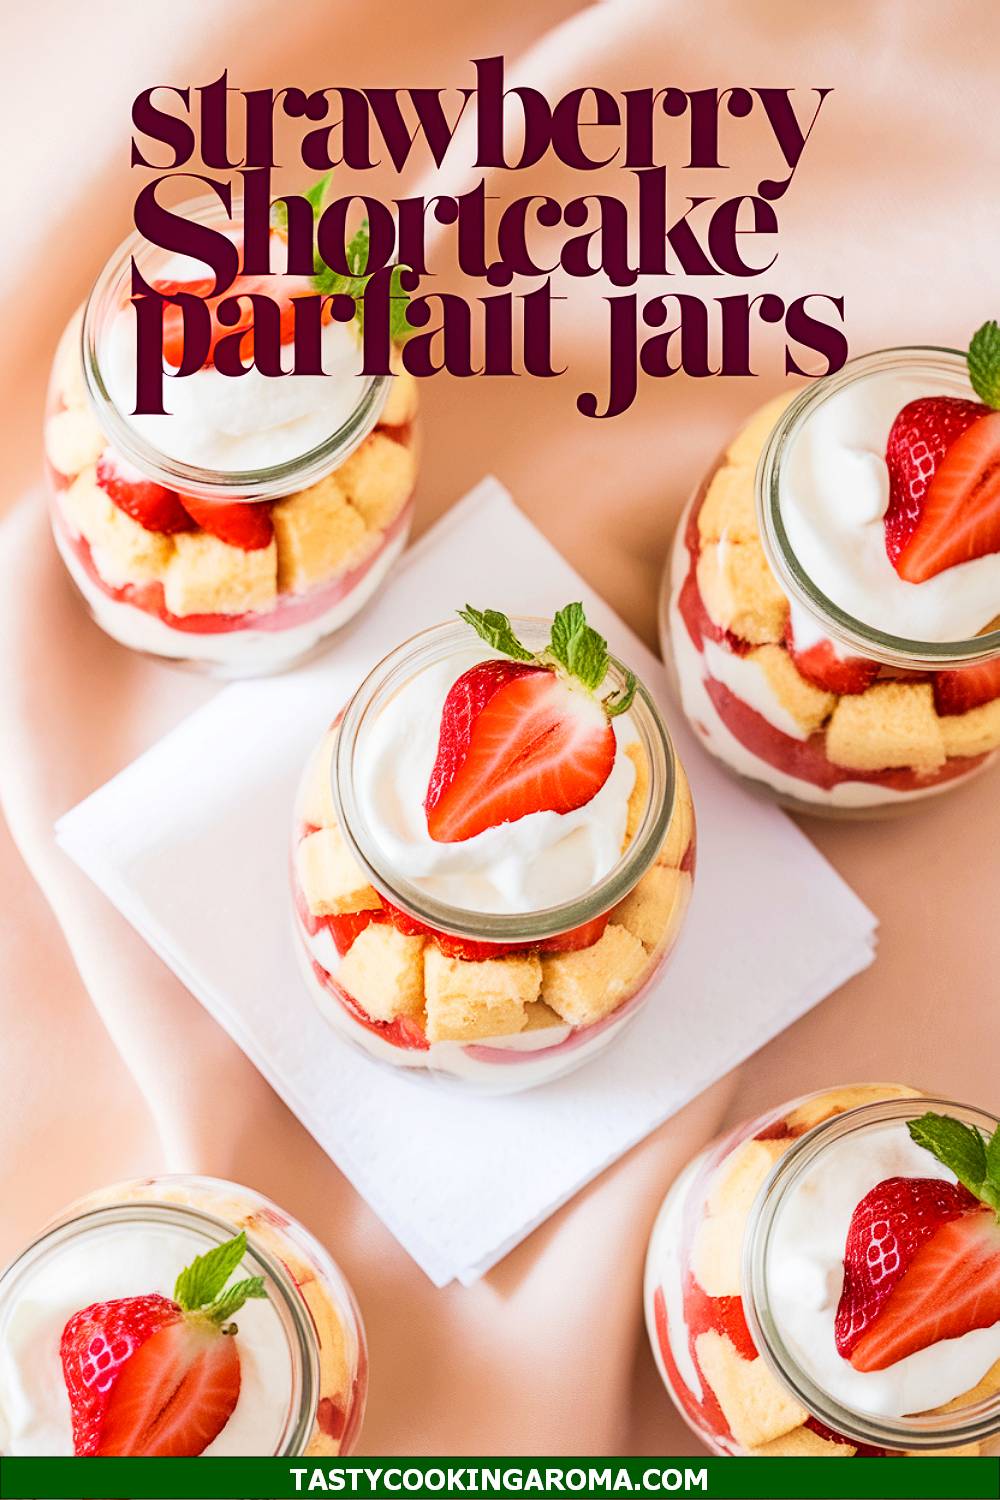
Strawberry Shortcake Parfait Jars
These Strawberry Shortcake Parfait Jars are a fun twist on a classic dessert, served in adorable jars for easy portioning. Layers of buttery shortcake, sweet strawberries, and whipped cream come together for a dessert that’s both simple and indulgent. The best part? You can assemble them ahead of time, making them perfect for a stress-free Valentine’s Day celebration. Plus, they’re so cute to serve!
Serving Size: 4 jars
Time Needed: 30 minutes
Ingredients
- 1 cup diced fresh strawberries
- 2 tablespoons granulated sugar
- 1 cup heavy whipping cream
- 2 tablespoons powdered sugar
- 1 teaspoon vanilla extract
- 4 shortcake biscuits (store-bought or homemade)
Instructions
- In a small bowl, toss diced strawberries with granulated sugar and let sit for 10 minutes to macerate.
- Meanwhile, whip the heavy cream, powdered sugar, and vanilla extract in a mixing bowl until soft peaks form.
- Break the shortcake biscuits into bite-sized pieces.
- In each jar, layer shortcake pieces, a spoonful of strawberries with their juices, and a dollop of whipped cream. Repeat the layers until the jar is full.
- Chill the jars in the fridge for at least 15 minutes before serving for the best flavor.
Quick Pros of the Recipe
- Easy to customize with different fruits or biscuits.
- Perfectly portioned for individual servings.
- Great for make-ahead desserts.
- Minimal prep time with a stunning result.
Ingredient Substitutions or Customization Ideas: Use angel food cake or pound cake instead of shortcake biscuits. Add a drizzle of chocolate sauce or a sprinkle of crushed nuts for extra flavor.
Cooking Tips and Tricks: Let the strawberries sit with sugar longer if you want more syrupy juices. For a fun presentation, tie a ribbon around each jar to make them extra festive!
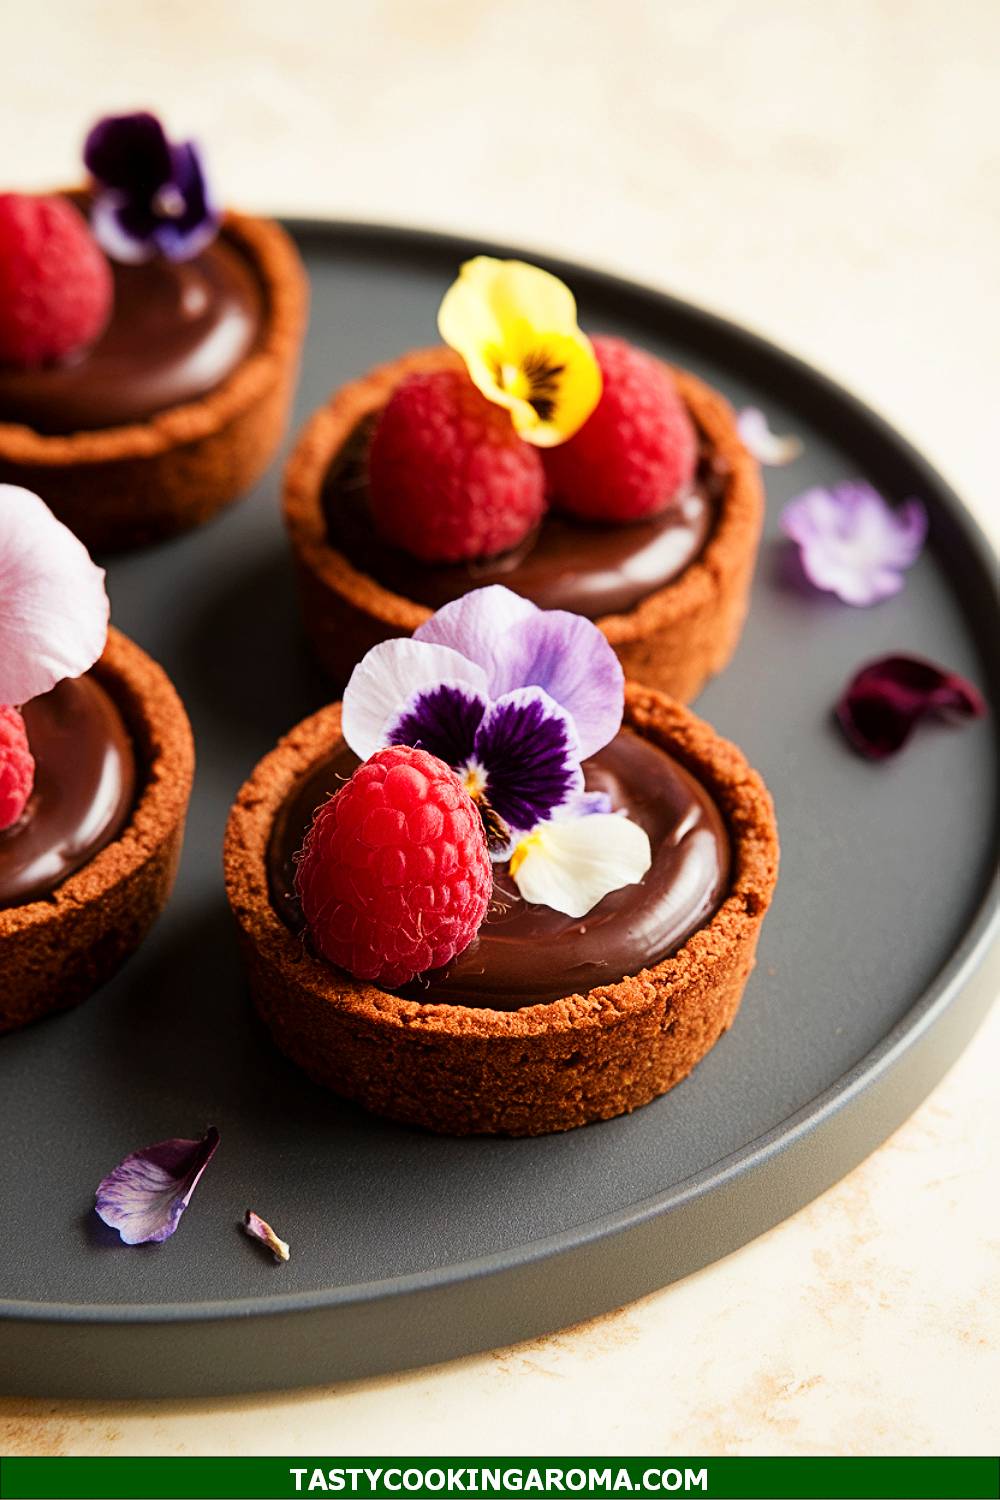
Chocolate Raspberry Tarts with Floral Garnishes
These Chocolate Raspberry Tarts are a decadent Valentine’s dessert that looks like it came straight from a fancy bakery. The rich chocolate ganache filling pairs perfectly with the tartness of fresh raspberries. Adding edible floral garnishes on top makes these tarts not only delicious but also visually stunning. They’re surprisingly simple to make, yet they’ll leave a lasting impression on your loved ones.
Serving Size: 6 mini tarts
Time Needed: 45 minutes
Ingredients
- 6 mini tart shells (store-bought or homemade)
- 1 cup dark chocolate chips
- 1/2 cup heavy cream
- 1 teaspoon vanilla extract
- Fresh raspberries (for topping)
- Edible flowers (optional, for garnish)
Instructions
- In a small saucepan, heat the heavy cream over medium heat until it just begins to simmer. Remove from heat.
- Place the dark chocolate chips in a heatproof bowl and pour the hot cream over them. Let sit for 2 minutes, then stir until the mixture is smooth and glossy.
- Add vanilla extract to the chocolate ganache and mix well.
- Fill each tart shell with the chocolate ganache, smoothing the top with a spoon or spatula.
- Top each tart with fresh raspberries and edible flowers, if using, and let them set in the fridge for 30 minutes before serving.
Quick Pros of the Recipe
- Rich and indulgent chocolate flavor.
- Beautiful presentation with minimal effort.
- Perfect balance of sweet and tart flavors.
- Great for those who love elegant desserts.
Ingredient Substitutions or Customization Ideas: Use white chocolate instead of dark chocolate for a sweeter tart. Add a sprinkle of sea salt on top for a gourmet touch.
Cooking Tips and Tricks: Make sure the tart shells are fully baked and cooled before adding the ganache. For a shinier ganache, stir in a small knob of butter while the chocolate is still warm.
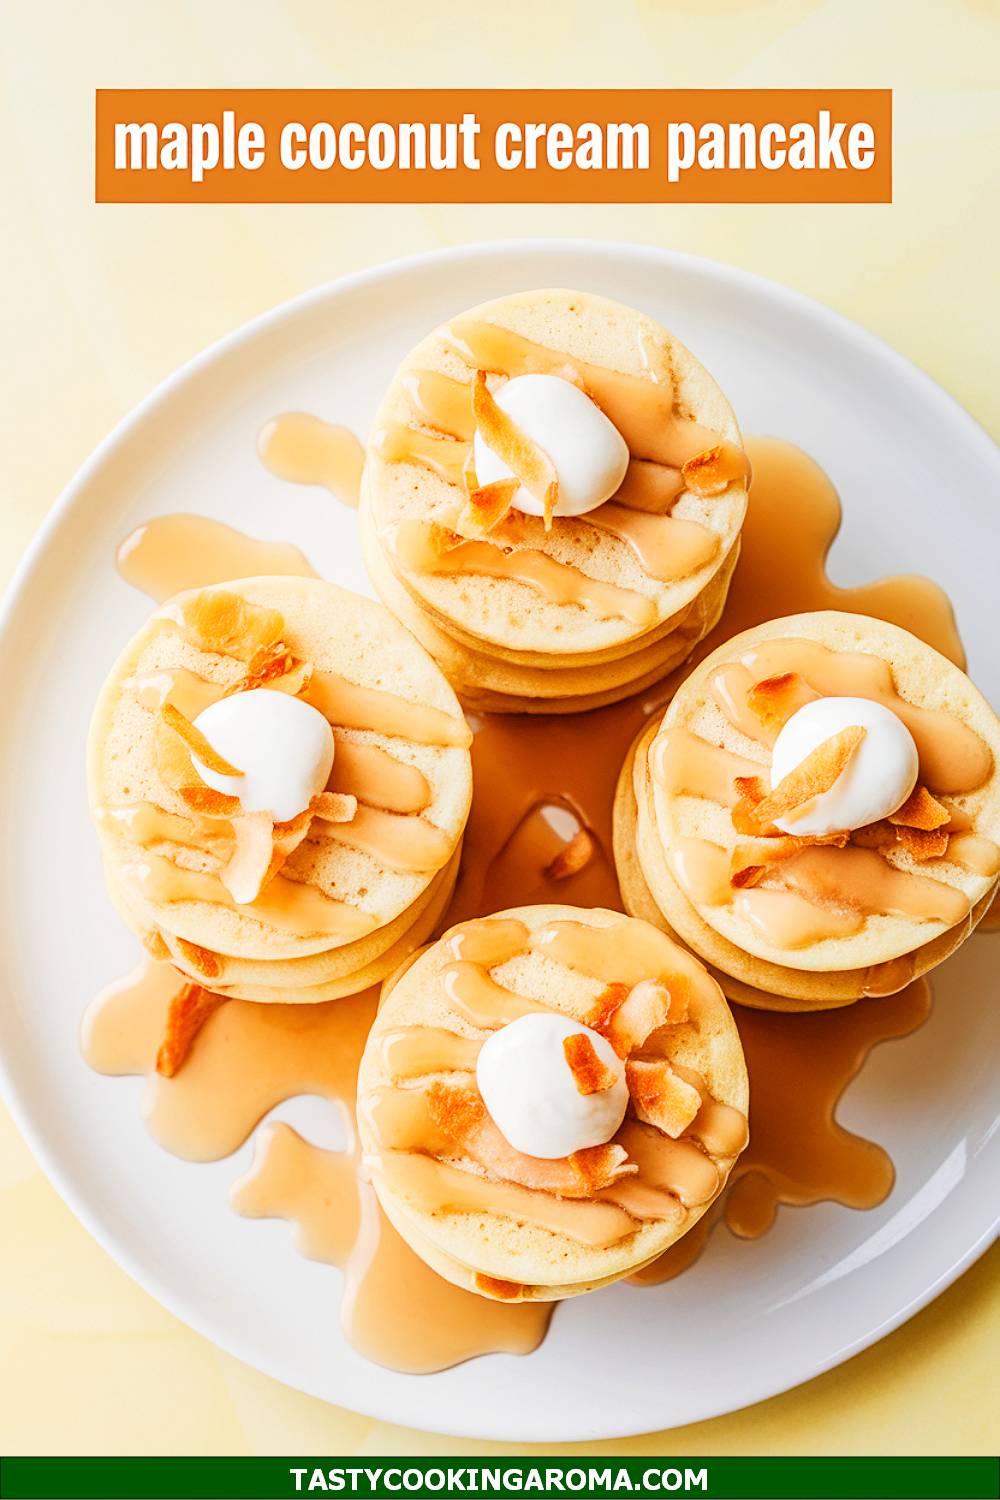
Maple Coconut Cream Puff Pancake Stacks
These Maple Coconut Cream Puff Pancake Stacks are a dreamy combination of fluffy pancakes and cream-filled puff pastry vibes. The coconut cream adds a tropical twist, while the maple syrup gives it that cozy, sweet touch perfect for Valentine mornings. It’s a dessert that feels indulgent but is surprisingly easy to make. Perfect for impressing your loved ones with minimal effort!
Serving Size: 4 servings
Time Needed: 40 minutes
Ingredients
- 1 cup all-purpose flour
- 1 tablespoon sugar
- 1 teaspoon baking powder
- 1/2 teaspoon baking soda
- 1/4 teaspoon salt
- 3/4 cup coconut milk
- 1 tablespoon melted butter
- 1 large egg
- 1/2 cup heavy cream
- 2 tablespoons powdered sugar
- 1/4 cup maple syrup
- Shredded coconut for garnish
Instructions
- In a medium bowl, whisk together the flour, sugar, baking powder, baking soda, and salt.
- In another bowl, mix the coconut milk, melted butter, and egg until smooth. Slowly combine the wet ingredients with the dry ingredients to create a pancake batter.
- Heat a non-stick skillet over medium heat and spoon 1/4 cup of batter for each pancake. Cook until bubbles form on the surface, then flip and cook for another minute. Repeat until all batter is used.
- In a separate chilled bowl, whip the heavy cream and powdered sugar until stiff peaks form.
- Stack the pancakes, layering each with a dollop of whipped cream. Drizzle maple syrup generously over the stack and sprinkle with shredded coconut for garnish.
Quick Pros of the Recipe
- Combines the best of pancakes and cream-filled desserts.
- Uses simple pantry ingredients with a tropical twist.
- Perfect for a Valentine’s Day breakfast or dessert.
- Visually stunning with minimal effort.
Ingredient Substitutions or Customization Ideas: Swap the coconut milk with almond milk or regular milk if preferred. Add a layer of strawberry or raspberry jam between the pancakes for a fruity twist.
Cooking Tips and Tricks: Use a cold bowl and whisk for whipping the cream—it helps it thicken faster. Make pancakes smaller for mini stacks that are easier to serve.
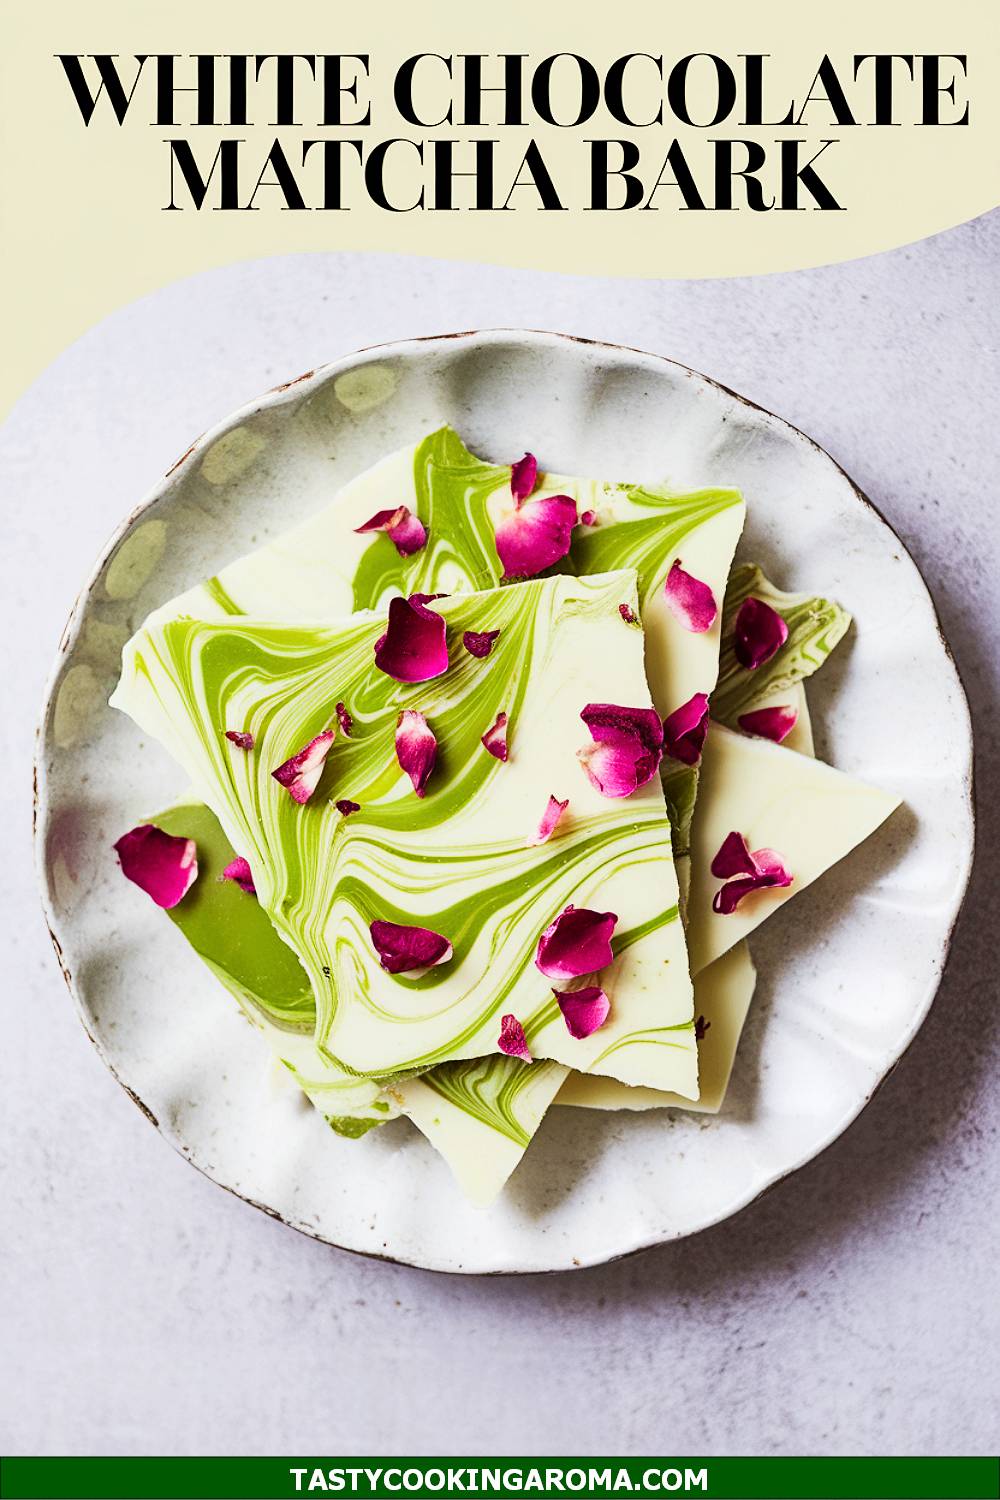
White Chocolate Matcha Bark with Edible Roses
This White Chocolate Matcha Bark with Edible Roses is as elegant as it is easy to make. The creamy sweetness of white chocolate pairs beautifully with the earthy, slightly bitter matcha flavor. The edible rose petals add a romantic and luxurious touch, making it a standout treat for Valentine’s Day. It’s a no-bake recipe that’s both quick and visually stunning!
Serving Size: 6 servings
Time Needed: 20 minutes
Ingredients
- 12 ounces white chocolate chips
- 1 teaspoon matcha powder
- 1 tablespoon coconut oil
- Edible rose petals for garnish
- Pinch of sea salt (optional)
Instructions
- Line a baking sheet with parchment paper and set aside.
- In a microwave-safe bowl, melt the white chocolate chips and coconut oil in 30-second intervals, stirring after each, until smooth.
- Sift the matcha powder into the melted chocolate and mix until fully combined. The mixture should turn a pale green color.
- Pour the chocolate mixture onto the prepared baking sheet and spread it out evenly to about 1/4-inch thickness.
- Sprinkle the edible rose petals and a pinch of sea salt (if using) over the chocolate while it’s still warm.
- Refrigerate the bark for 15 minutes or until fully set. Break into pieces and serve.
Quick Pros of the Recipe
- Quick and requires no baking.
- Visually stunning with its green and pink hues.
- Combines sweet, earthy, and floral flavors.
- Perfect for gifting or sharing on Valentine’s Day.
Ingredient Substitutions or Customization Ideas: Use dark chocolate instead of white chocolate for a richer flavor. You can also substitute the matcha with powdered freeze-dried strawberries for a fruity version.
Cooking Tips and Tricks: Sift the matcha powder to avoid any clumps in the chocolate. Work quickly when spreading the chocolate to ensure the toppings stick before it hardens.
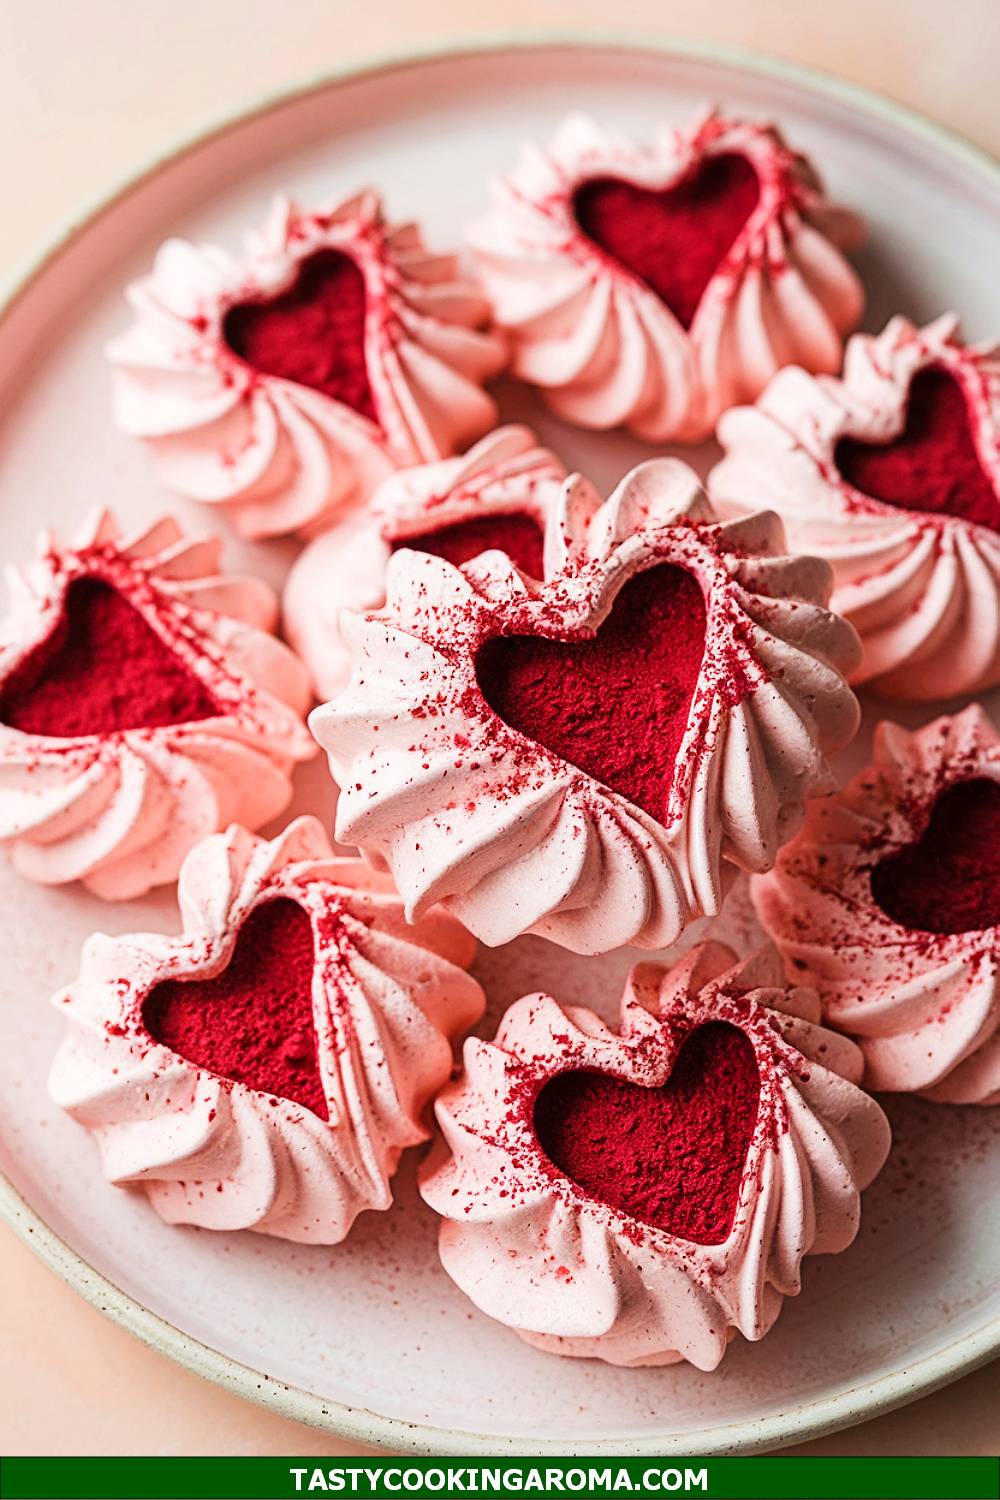
Heart-Shaped Raspberry Meringues
These Heart-Shaped Raspberry Meringues are light, airy, and melt-in-your-mouth delicious. The bright raspberry flavor adds a fruity punch to the sweet meringue, making it a perfect Valentine’s Day treat. Their adorable heart shape makes them a fun and festive option for kids and adults alike. Plus, they’re naturally gluten-free and low in calories!
Serving Size: 8 servings
Time Needed: 2 hours (including baking time)
Ingredients
- 3 large egg whites
- 3/4 cup granulated sugar
- 1/4 teaspoon cream of tartar
- 1/4 teaspoon vanilla extract
- 1 tablespoon freeze-dried raspberry powder
Instructions
- Preheat your oven to 200°F (90°C) and line a baking sheet with parchment paper.
- In a clean, dry bowl, beat the egg whites with the cream of tartar using an electric mixer until soft peaks form.
- Gradually add the sugar, one tablespoon at a time, while continuing to beat the mixture. Beat until stiff, glossy peaks form.
- Gently fold in the vanilla extract and raspberry powder until fully incorporated.
- Transfer the meringue mixture into a piping bag fitted with a star tip. Pipe heart shapes onto the prepared baking sheet.
- Bake the meringues for 1.5 to 2 hours, or until they are dry to the touch. Turn off the oven and let them cool inside for 30 minutes before removing.
Quick Pros of the Recipe
- Light and airy, perfect for a low-calorie option.
- Adorable heart shapes make them festive and fun.
- Bright raspberry flavor adds a fruity twist to traditional meringue.
- Great for gluten-free eaters.
Ingredient Substitutions or Customization Ideas: Swap the raspberry powder for strawberry or blueberry powder for a different flavor. Add a few drops of pink food coloring for a more vibrant hue.
Cooking Tips and Tricks: Make sure your mixing bowl is completely clean and grease-free to help the egg whites whip properly. Pipe the meringues slowly to create precise heart shapes.
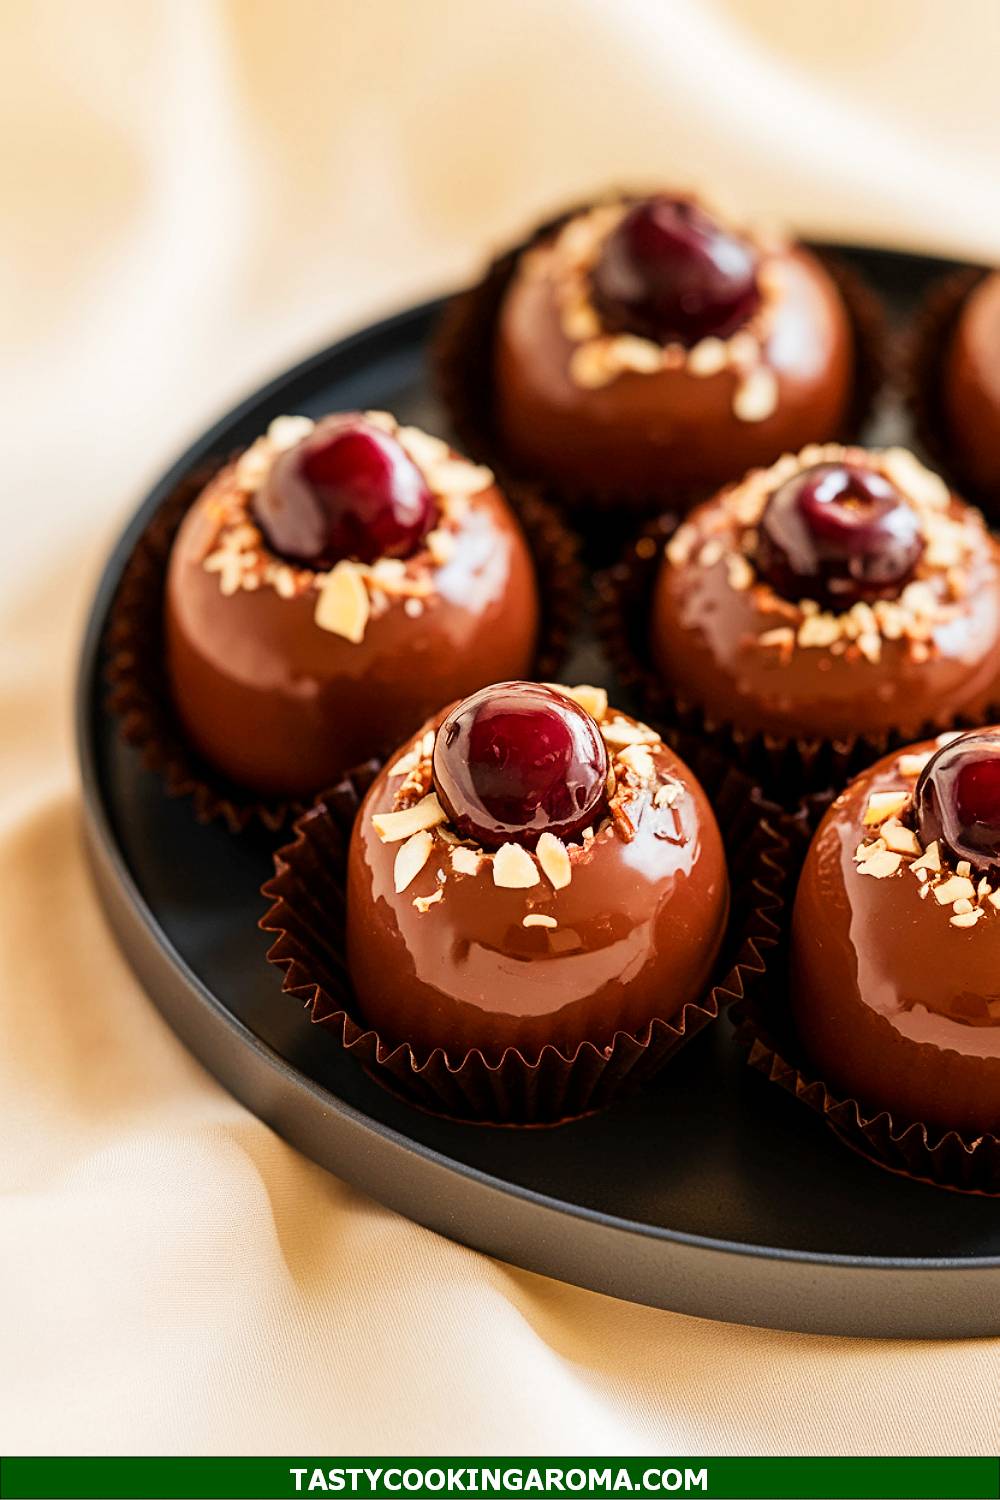
Chocolate Cherry Almond Bonbons
These Chocolate Cherry Almond Bonbons are the ultimate treat for Valentine’s Day. The combination of rich chocolate, sweet cherry filling, and the nutty crunch of almonds creates a delightful bite-sized dessert that feels fancy but is surprisingly easy to make. They’re perfect for gifting or as a centerpiece on your dessert table. Plus, they look so cute, you’ll want to snap a picture before digging in!
Serving Size: 12 bonbons
Time Needed: 45 minutes
Ingredients
- 1 cup semi-sweet chocolate chips
- 12 maraschino cherries (drained and patted dry)
- 1/4 cup almond paste
- 1/4 cup finely chopped almonds
- 1 teaspoon coconut oil
- Sprinkles or edible glitter (optional, for decoration)
Instructions
- Melt the chocolate chips and coconut oil together in a microwave-safe bowl, stirring every 30 seconds until smooth.
- Roll small pieces of almond paste into flat discs and wrap them around each maraschino cherry, then roll the cherry in chopped almonds to coat.
- Using a fork, dip each coated cherry into the melted chocolate, ensuring it’s fully covered, and place it on parchment paper to set.
- Decorate with sprinkles or edible glitter before the chocolate hardens for a festive touch. Allow the bonbons to cool and set completely before serving.
Quick Pros of the Recipe
- Combines multiple textures—crunchy, gooey, and creamy.
- Perfect for both gifting and snacking.
- Minimal ingredients and no baking required.
- Customizable with different types of nuts or decorations.
Ingredient Substitutions or Customization Ideas: Swap almond paste with peanut butter or hazelnut spread for a different flavor. You can also use white chocolate instead of semi-sweet chocolate for a sweeter option.
Cooking Tips and Tricks: Make sure the cherries are completely dry before wrapping them in almond paste to prevent the chocolate from slipping off. For a smoother finish, use a toothpick to dip the cherries instead of a fork.
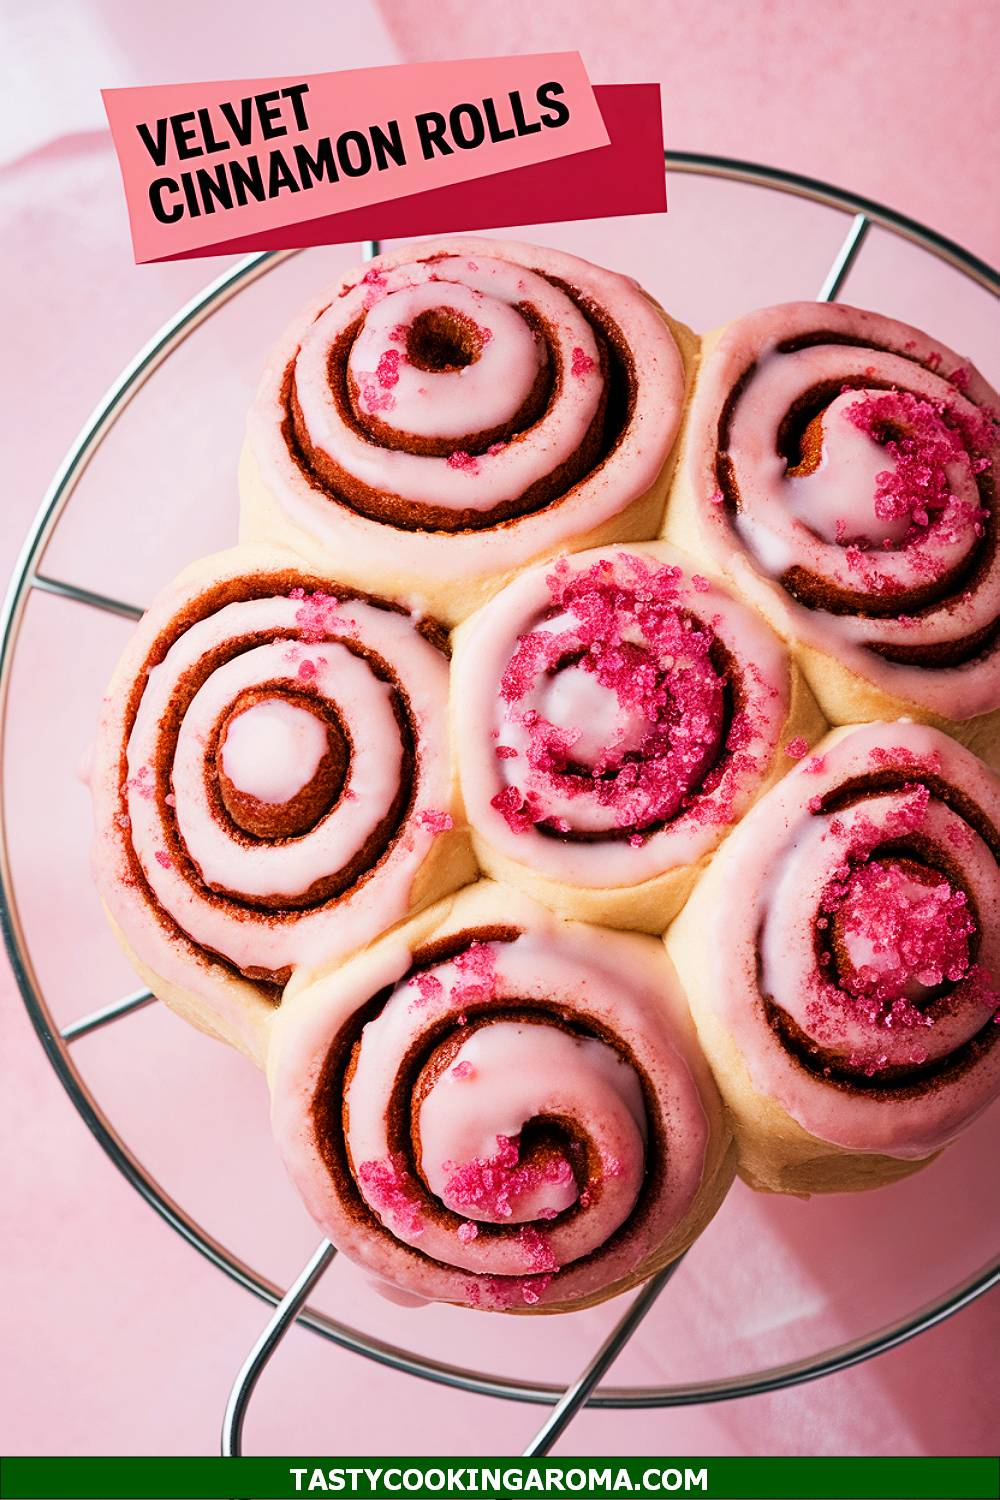
Pink Velvet Cinnamon Rolls
These Pink Velvet Cinnamon Rolls are soft, sweet, and perfect for a Valentine’s Day breakfast or dessert. The pink-hued dough adds a festive touch, and the gooey cinnamon-sugar filling is just the right amount of indulgence. Topped with a creamy glaze, they look and taste like a labor of love but are surprisingly simple to prepare. They’re a fun twist on a classic comfort food that everyone will love!
Serving Size: 8 rolls
Time Needed: 2 hours (including rising time)
Ingredients
- 3 cups all-purpose flour
- 1 packet (2 1/4 tsp) instant yeast
- 1/4 cup sugar
- 1/2 cup warm milk
- 1/4 cup melted butter
- 1 egg
- 1 teaspoon red food coloring
- 1/4 cup brown sugar
- 1 tablespoon cinnamon
- 1 cup powdered sugar (for glaze)
- 2 tablespoons milk (for glaze)
Instructions
- In a large mixing bowl, combine flour, yeast, and sugar. Add warm milk, melted butter, egg, and red food coloring, then mix until a soft dough forms.
- Knead the dough on a floured surface for about 8 minutes, then place it in a greased bowl, cover, and let it rise for 1 hour or until doubled in size.
- Roll the dough into a rectangle, spread with melted butter, and sprinkle with brown sugar and cinnamon. Roll tightly into a log and cut into 8 even pieces.
- Place the rolls in a greased baking dish, cover, and let rise for another 30 minutes. Bake at 350°F (175°C) for 20–25 minutes, then drizzle with glaze made from powdered sugar and milk.
Quick Pros of the Recipe
- Perfectly festive with the pink dough for Valentine’s Day.
- Soft, fluffy texture that melts in your mouth.
- Customizable with different fillings or glazes.
- Great for breakfast, dessert, or a sweet snack.
Ingredient Substitutions or Customization Ideas: For a unique twist, replace the cinnamon-sugar filling with strawberry jam or Nutella. You can also use cream cheese frosting instead of the powdered sugar glaze for extra richness.
Cooking Tips and Tricks: Make sure your milk is warm (not hot) to activate the yeast properly. If you want taller rolls, use a smaller baking dish to keep them packed tightly together.
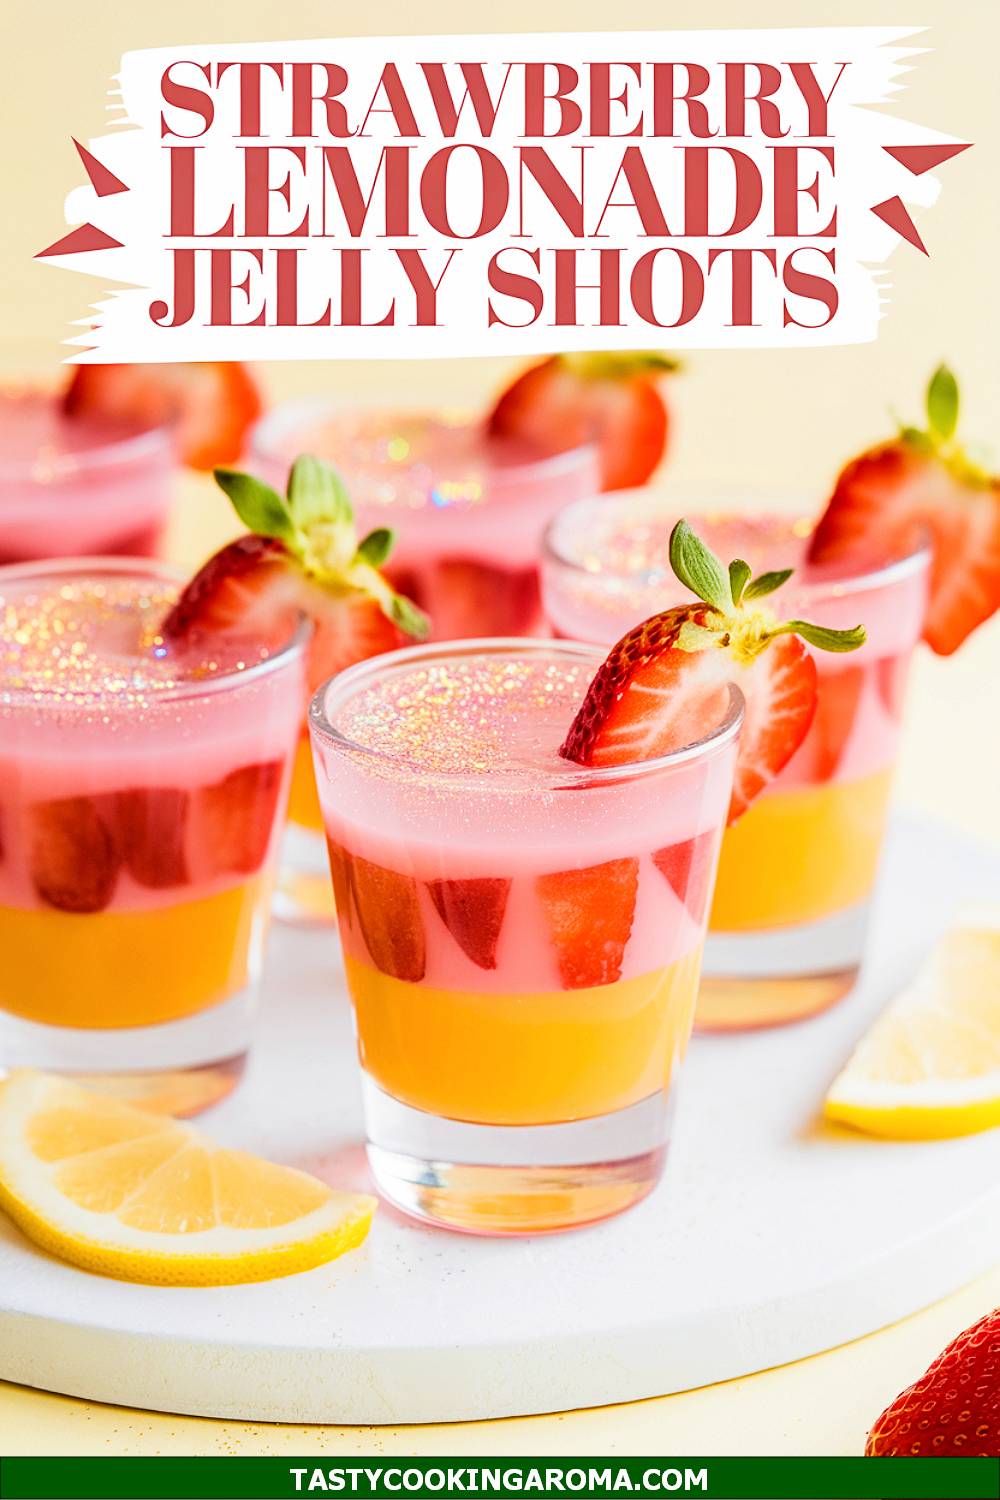
Sparkling Strawberry Lemonade Jelly Shots
These Sparkling Strawberry Lemonade Jelly Shots are a fun and refreshing dessert idea for Valentine’s Day parties. They’re fruity, fizzy, and absolutely adorable served in little cups or molds. The combination of sweet strawberries and tangy lemonade is perfectly balanced, and the sparkle adds a playful vibe. Whether you’re hosting a party or enjoying a quiet evening, these jelly shots are sure to impress!
Serving Size: 12 jelly shots
Time Needed: 2 hours (including chilling time)
Ingredients
- 1 cup strawberry lemonade (store-bought or homemade)
- 1/2 cup sparkling water or champagne
- 1 packet unflavored gelatin
- 1/4 cup sugar
- 1/4 cup diced strawberries
- Edible glitter or sugar for garnish (optional)
Instructions
- In a small saucepan, heat the strawberry lemonade and sugar over medium heat until the sugar dissolves. Do not boil.
- Sprinkle the gelatin over the mixture and whisk until fully dissolved. Remove from heat and let cool slightly.
- Stir in the sparkling water or champagne and pour the mixture into small cups or silicone molds. Add a few diced strawberries to each cup for extra flavor and texture.
- Refrigerate for at least 2 hours or until fully set. Garnish with edible glitter or sugar before serving, if desired.
Quick Pros of the Recipe
- Fruity, fizzy, and fun to eat.
- Great for parties or festive gatherings.
- Customizable with different fruits or flavors.
- Easy to prepare with minimal ingredients.
Ingredient Substitutions or Customization Ideas: Swap strawberry lemonade for raspberry lemonade or peach juice for a different flavor profile. For a non-alcoholic version, replace champagne with sparkling apple cider.
Cooking Tips and Tricks: Use silicone molds for easy removal and perfect shapes. To avoid bubbles, pour the mixture slowly into the molds and let it settle before refrigerating.
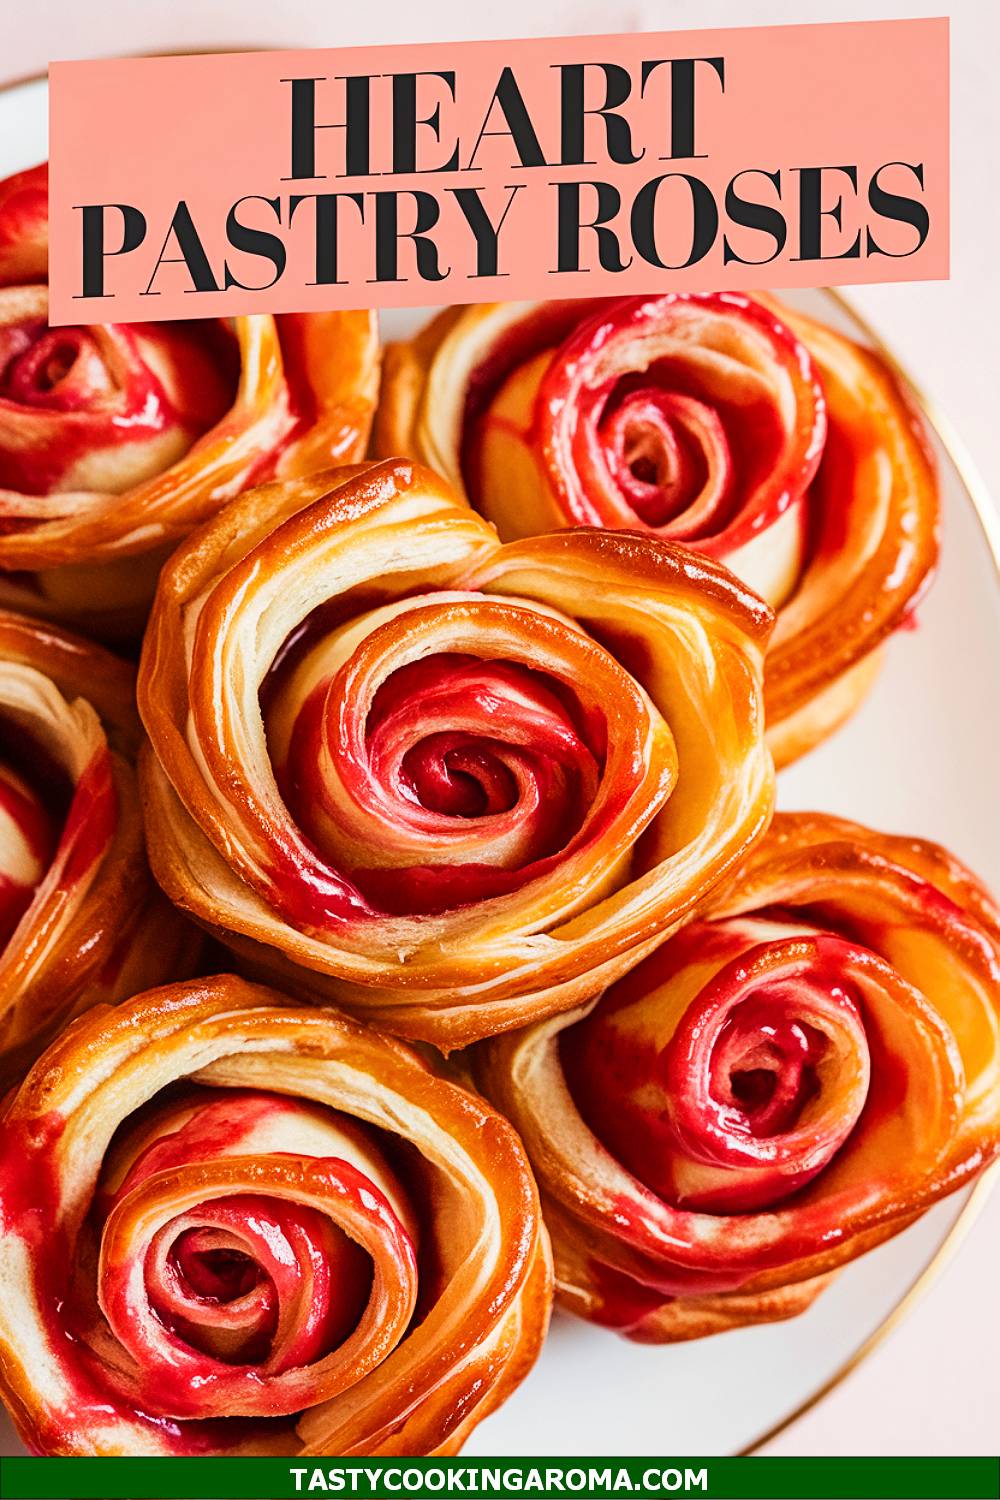
Heart-Shaped Puff Pastry Roses with Strawberry Glaze
These heart-shaped puff pastry roses are the perfect Valentine’s Day treat to wow your loved ones! The flaky, buttery puff pastry pairs beautifully with the sweet and slightly tangy strawberry glaze, making each bite irresistible. They look fancy but are surprisingly easy to make, and the rose shape adds an elegant, romantic touch. Plus, they’re a fun project if you’re looking for something creative to bake with kids or friends.
Serving Size: 6 servings
Time Needed: 45 minutes
Ingredients
- 1 sheet of frozen puff pastry, thawed
- 1/4 cup strawberry jam or preserves
- 1–2 tablespoons water
- 1 egg (for egg wash)
- Powdered sugar (optional, for garnish)
Instructions
- Preheat your oven to 375°F (190°C) and line a baking sheet with parchment paper.
- Roll out the puff pastry sheet on a floured surface and cut it into long strips (about 1 inch wide).
- In a small bowl, mix the strawberry jam with water to create a smooth glaze consistency.
- Brush a thin layer of the strawberry glaze onto each strip of puff pastry.
- Carefully roll each strip into a rose shape, pinching the bottom to hold its form, and place it on the prepared baking sheet.
- Lightly beat the egg and brush it over the tops of the roses for a golden finish.
- Bake for 20–25 minutes, or until the pastries are puffed and golden brown.
- Let cool slightly, then dust with powdered sugar if desired. Serve warm or at room temperature.
Quick Pros of the Recipe
- Visually stunning and perfect for Valentine’s Day.
- Simple ingredients and easy to prepare.
- Customizable with different fruit glazes or flavors.
- Great for making with kids or as a creative activity.
Ingredient Substitutions or Customization Ideas: Swap the strawberry glaze for raspberry or apricot jam for a different flavor. You can also add a sprinkle of cinnamon sugar to the pastry strips for extra flavor before rolling.
Cooking Tips and Tricks: Make sure the puff pastry is cold when you’re working with it to ensure the best rise. If your roses lose shape while baking, gently reshape them with a spoon while they’re still warm.
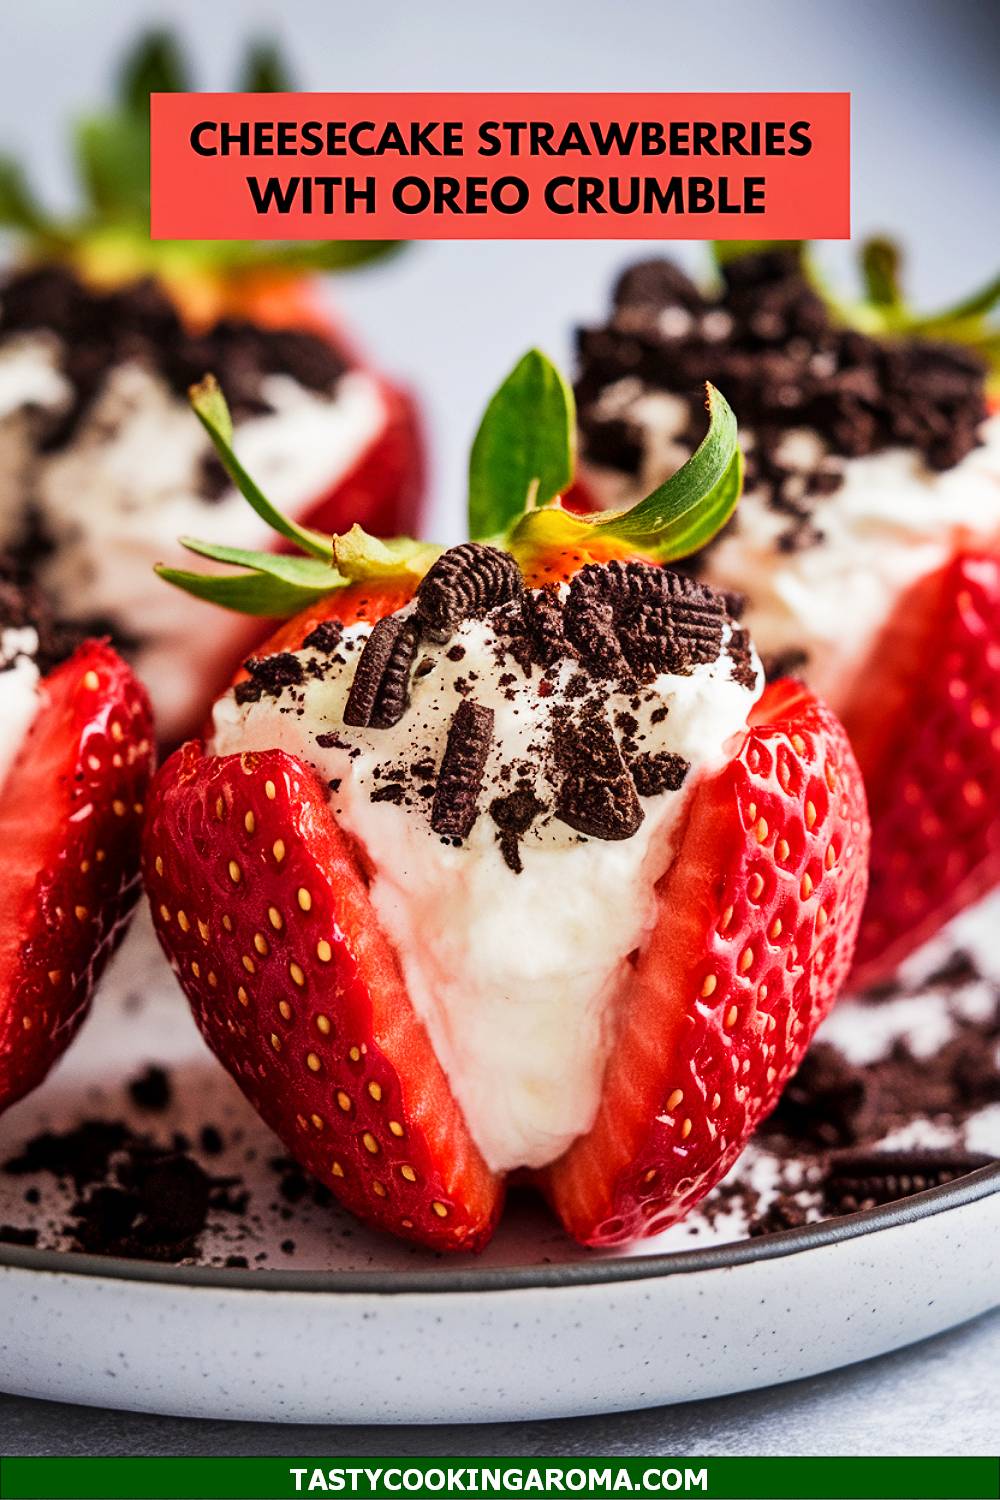
Cheesecake-Stuffed Strawberries with Oreo Crumble
If you’re looking for a no-bake Valentine’s treat, these cheesecake-stuffed strawberries are a winner! The juicy strawberries are filled with a creamy cheesecake filling and topped with a crunchy Oreo crumble for the perfect mix of textures. They’re bite-sized, making them great for sharing or serving at a party. Best of all, they’re super easy to make and require minimal ingredients.
Serving Size: 12 servings
Time Needed: 20 minutes
Ingredients
- 12 large strawberries
- 4 ounces cream cheese, softened
- 2 tablespoons powdered sugar
- 1/2 teaspoon vanilla extract
- 4 Oreo cookies, crushed
Instructions
- Wash and dry the strawberries, then hull them using a small knife or strawberry huller to create a cavity for the filling.
- In a mixing bowl, beat the cream cheese, powdered sugar, and vanilla extract until smooth and creamy.
- Spoon or pipe the cheesecake mixture into the hollowed-out strawberries.
- Sprinkle the Oreo crumble on top of each stuffed strawberry for a crunchy finish.
- Chill in the refrigerator for 10–15 minutes before serving for the best texture.
Quick Pros of the Recipe
- No baking required—perfect for quick preparation.
- Light, creamy, and refreshing flavor combination.
- Ideal for parties or as a romantic snack for two.
- Customizable with different toppings like graham cracker crumbs or chocolate shavings.
Ingredient Substitutions or Customization Ideas: Replace the Oreo crumble with graham cracker crumbs for a classic cheesecake feel. You can also drizzle melted chocolate over the stuffed strawberries for an extra decadent touch.
Cooking Tips and Tricks: Use a piping bag or a zip-top bag with the corner snipped off for a neater filling process. Make sure the strawberries are completely dry before stuffing to prevent the filling from sliding out.
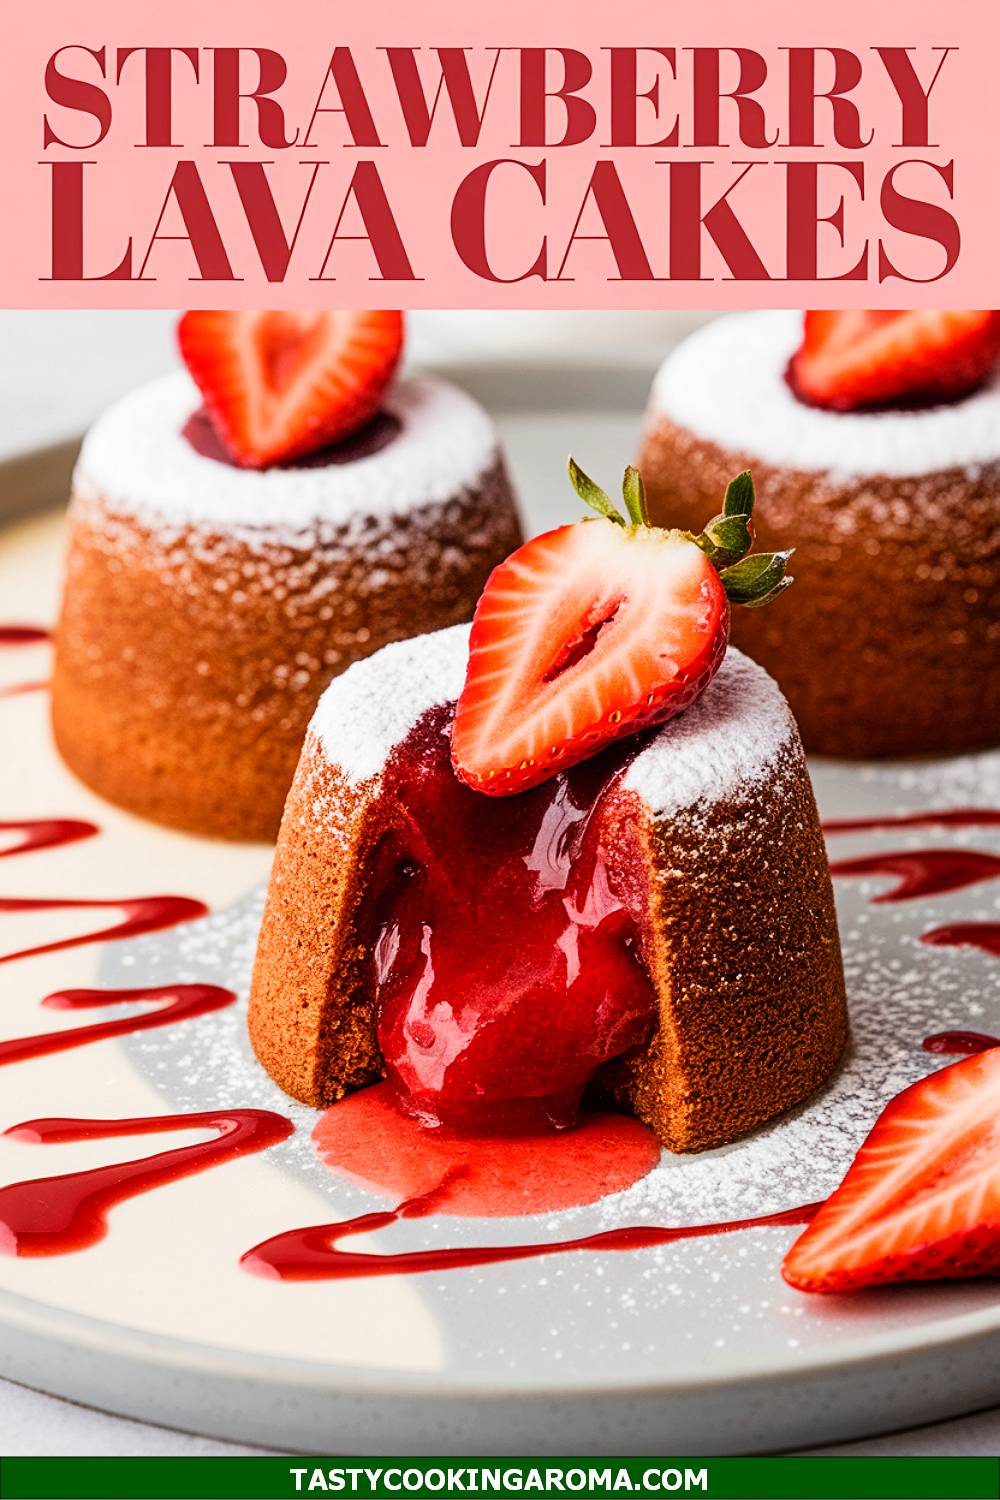
Strawberry Lava Cakes with Gooey Center
These strawberry lava cakes are a romantic twist on the classic chocolate version, featuring a molten strawberry center that spills out when you cut into them. The combination of soft cake and warm, gooey strawberry filling is pure magic. They’re perfect for impressing your Valentine but are surprisingly easy to whip up. Serve them with a scoop of vanilla ice cream or a dollop of whipped cream for the ultimate dessert experience.
Serving Size: 4 servings
Time Needed: 35 minutes
Ingredients
- 1/2 cup all-purpose flour
- 1/4 cup sugar
- 1/4 cup unsalted butter, melted
- 1 large egg
- 1/4 teaspoon vanilla extract
- 4 tablespoons strawberry jam
- Powdered sugar (optional, for garnish)
Instructions
- Preheat your oven to 350°F (175°C) and grease four ramekins or small baking dishes.
- In a mixing bowl, whisk together the flour, sugar, melted butter, egg, and vanilla extract until smooth.
- Fill each ramekin halfway with the batter, then add a tablespoon of strawberry jam to the center of each.
- Cover the jam with the remaining batter, ensuring it’s fully sealed inside.
- Bake for 15–18 minutes, or until the edges are set but the center is still slightly jiggly.
- Let the cakes cool for 5 minutes, then carefully invert them onto plates. Dust with powdered sugar and serve warm.
Quick Pros of the Recipe
- Unique twist on classic lava cakes with a fruity center.
- Perfect for a romantic dessert or special occasion.
- Simple ingredients and easy to prepare in under 40 minutes.
- Pairs beautifully with ice cream or whipped cream.
Ingredient Substitutions or Customization Ideas: Use raspberry jam instead of strawberry for a tangier filling. You can also add a few chocolate chips to the batter for a chocolate-strawberry combo.
Cooking Tips and Tricks: Don’t overbake the lava cakes; the gooey center is what makes them special. Run a knife around the edges of the ramekins before inverting to ensure a clean release.
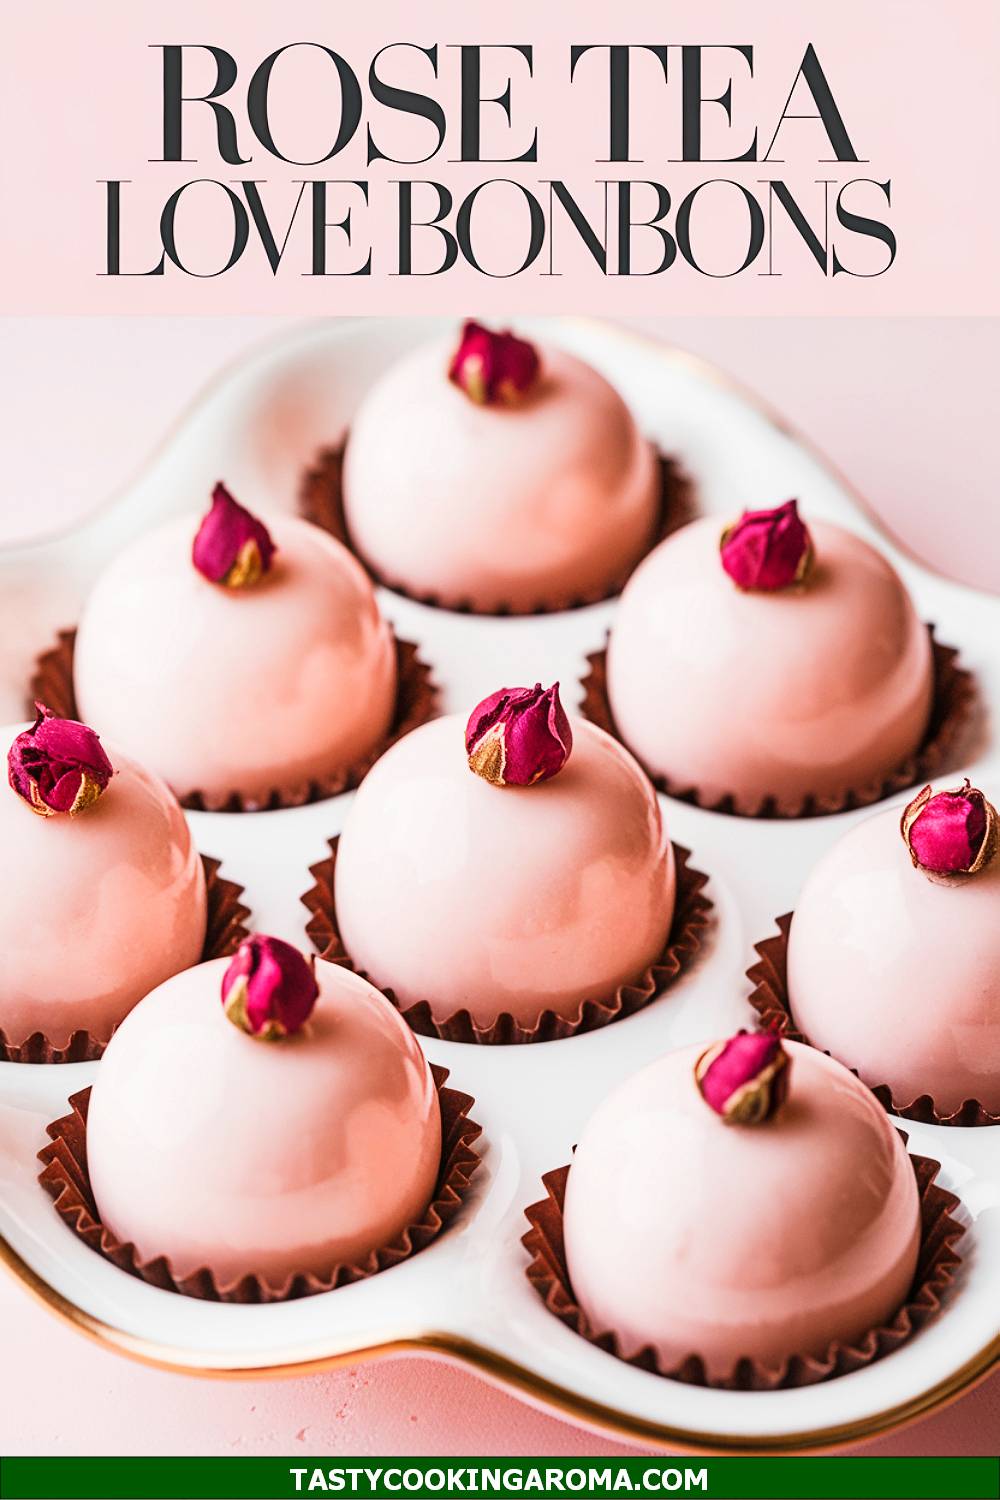
DIY Rose Tea Valentine Bonbons
These DIY Rose Tea Valentine Bonbons are a fragrant treat that feels both fancy and fun to make. The combination of creamy white chocolate and the subtle, floral aroma of rose tea makes them perfect for a romantic Valentine’s Day. They’re surprisingly simple to prepare and look stunning when wrapped or plated for gifting. This recipe is great if you want to try something new and impress your loved ones with a touch of elegance.
Serving Size: 12 bonbons
Time Needed: 45 minutes
Ingredients
- 1 cup white chocolate chips
- 1/4 cup heavy cream
- 1 tablespoon dried rose petals (edible grade)
- 2 rose tea bags
- 1 teaspoon vanilla extract
- Sprinkles, edible glitter, or extra rose petals for garnish
Instructions
- In a small saucepan, heat the heavy cream over low heat until it just starts to simmer. Remove from heat and steep the rose tea bags in the cream for 5–7 minutes to infuse the flavor.
- Strain the cream to remove the tea leaves and rose petals. Return the cream to the saucepan and add the white chocolate chips.
- Stir gently over low heat until the chocolate is fully melted and the mixture is smooth. Add the vanilla extract and mix well.
- Pour the chocolate mixture into silicone molds or a parchment-lined tray. If using molds, tap them gently to remove any air bubbles.
- Sprinkle with edible glitter, rose petals, or sprinkles for decoration. Let the bonbons set in the refrigerator for at least 30 minutes.
- Once firm, remove the bonbons from the molds or cut them into shapes if using a tray. Serve or gift them as desired!
Quick Pros of the Recipe
- Unique floral flavor that feels luxurious.
- Easy to customize with different decorations.
- Perfect for gifting or serving at a Valentine’s tea party.
Ingredient Substitutions or Customization Ideas: If you’re not a fan of rose tea, try swapping it with chamomile, lavender, or even Earl Grey tea. For a dairy-free version, use coconut cream instead of heavy cream.
Cooking Tips and Tricks: Be careful not to overheat the chocolate mixture, as white chocolate can scorch easily. If you don’t have molds, use a mini cupcake tray for adorable round bonbons.
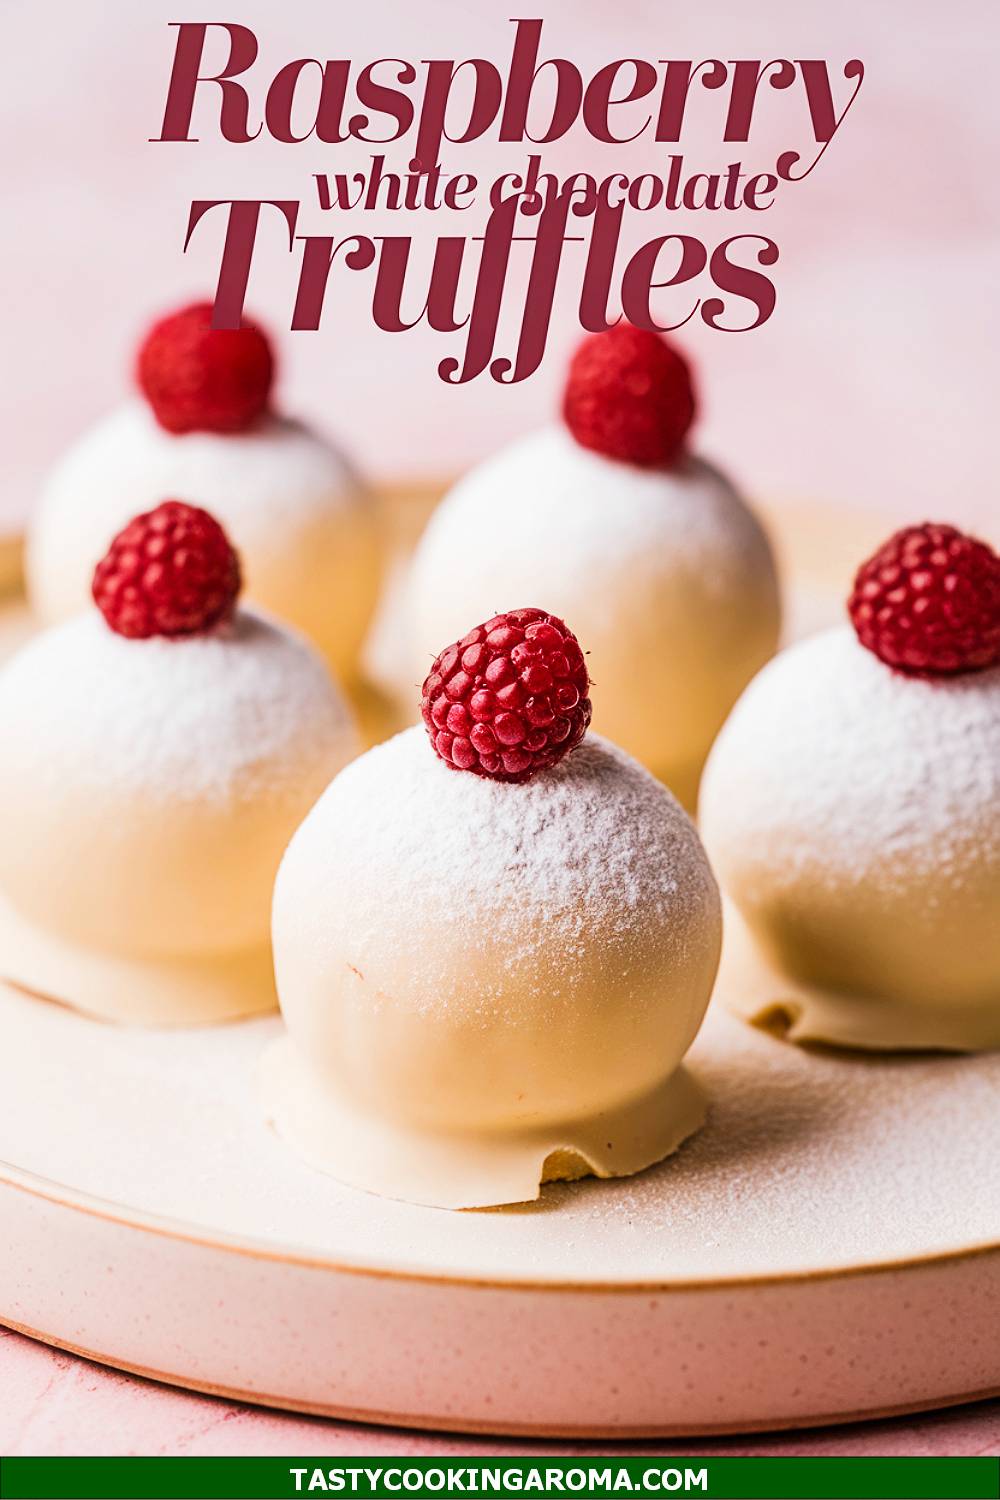
Raspberry-Filled White Chocolate Truffles
Raspberry-Filled White Chocolate Truffles are a dreamy combination of tangy fruit and smooth chocolate. The creamy white chocolate shell perfectly complements the sweet and slightly tart raspberry filling. These make an indulgent dessert that’s surprisingly easy to prepare at home. They’re like little pockets of joy that’ll make anyone’s Valentine’s Day extra special!
Serving Size: 10 truffles
Time Needed: 1 hour (including setting time)
Ingredients
- 1 1/2 cups white chocolate chips
- 1/4 cup heavy cream
- 1/2 cup fresh or frozen raspberries
- 1 tablespoon powdered sugar
- 1 teaspoon vanilla extract
- Sprinkles or crushed freeze-dried raspberries for garnish
Instructions
- In a small saucepan, heat the raspberries and powdered sugar over low-medium heat, stirring occasionally until the mixture thickens slightly. Strain the raspberry mixture to remove seeds, then let it cool.
- In a separate saucepan, heat the heavy cream over low heat until warm. Add the white chocolate chips and stir until melted and smooth. Mix in the vanilla extract.
- Using small molds or your hands, form hollow white chocolate shells (tip: coat the molds in a layer of melted white chocolate and freeze briefly to set). Fill each shell with a tiny spoonful of the raspberry mixture.
- Seal the truffles by covering the filling with additional melted white chocolate. Let the truffles set in the refrigerator for about 30 minutes.
- Decorate with sprinkles or crushed freeze-dried raspberries before serving.
Quick Pros of the Recipe
- Combines creamy and fruity flavors for a balanced treat.
- Perfect for any Valentine’s dessert table or as a gift.
- Uses common ingredients you likely already have in your pantry.
Ingredient Substitutions or Customization Ideas: If raspberries aren’t your favorite, substitute strawberries or blueberries for the filling. For extra crunch, consider adding finely chopped nuts to the outer shell.
Cooking Tips and Tricks: Use a piping bag for more precise filling and shell-sealing. Keep the truffles refrigerated if not serving immediately, as the filling can soften at room temperature.
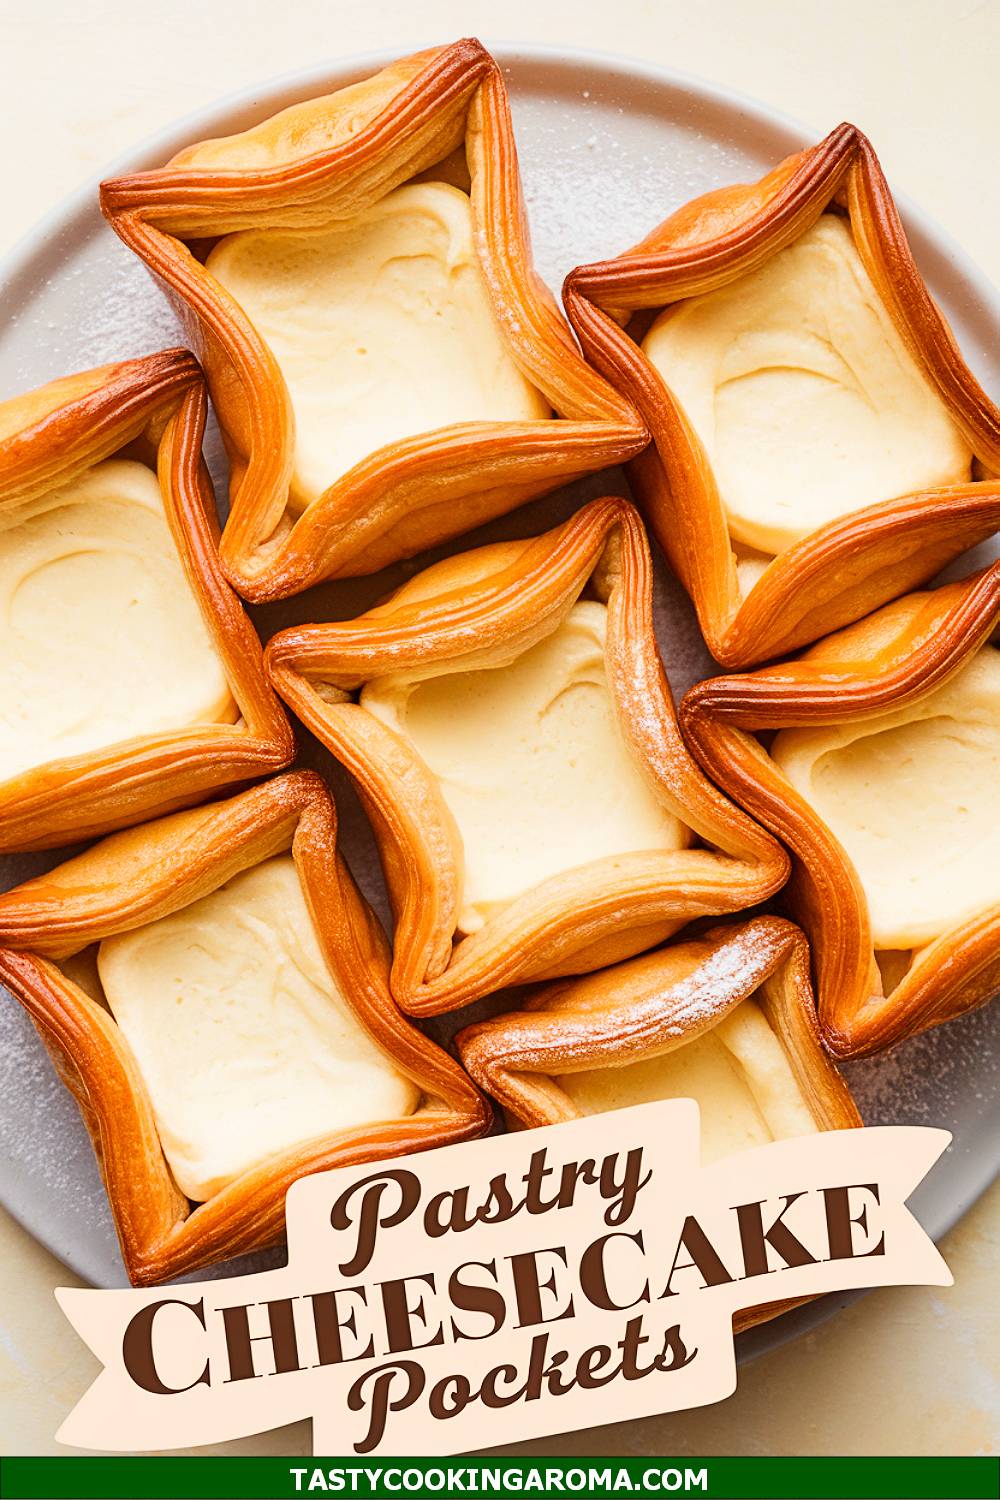
Mini Puff Pastry Cheesecake Pockets
These Mini Puff Pastry Cheesecake Pockets are the perfect combination of creamy cheesecake filling and flaky, buttery pastry. They’re bite-sized delights that work great as a sweet snack or a fancy dessert. The best part? They’re so easy to make with store-bought puff pastry, yet they look like something straight out of a bakery. These are bound to be a hit with kids and adults alike!
Serving Size: 6 pockets
Time Needed: 40 minutes
Ingredients
- 1 sheet puff pastry, thawed
- 4 ounces cream cheese, softened
- 1/4 cup powdered sugar
- 1 teaspoon vanilla extract
- 1 egg (for egg wash)
- Strawberry or raspberry jam (optional, for filling)
Instructions
- Preheat your oven to 375°F (190°C). Line a baking sheet with parchment paper.
- In a small bowl, mix the cream cheese, powdered sugar, and vanilla extract until smooth and creamy.
- Roll out the puff pastry sheet and cut it into 6 equal rectangles. Place a spoonful of the cream cheese mixture in the center of each rectangle, and if desired, add a dollop of jam for extra flavor.
- Fold each rectangle in half to form a pocket and press the edges with a fork to seal. Brush the tops with egg wash for a golden finish.
- Bake for 18–20 minutes, or until the pockets are puffed and golden. Let them cool slightly before serving.
Quick Pros of the Recipe
- Uses store-bought puff pastry for quick preparation.
- Combines creamy cheesecake with a flaky crust.
- Customizable with different jams or fillings.
Ingredient Substitutions or Customization Ideas: Swap the cream cheese filling with chocolate spread or add a pinch of cinnamon for a warm twist. You can also top the pockets with powdered sugar or a drizzle of icing for added sweetness.
Cooking Tips and Tricks: Make sure to fully seal the edges to prevent the filling from leaking during baking. If you want extra flaky layers, chill the assembled pockets in the fridge for 10 minutes before baking.
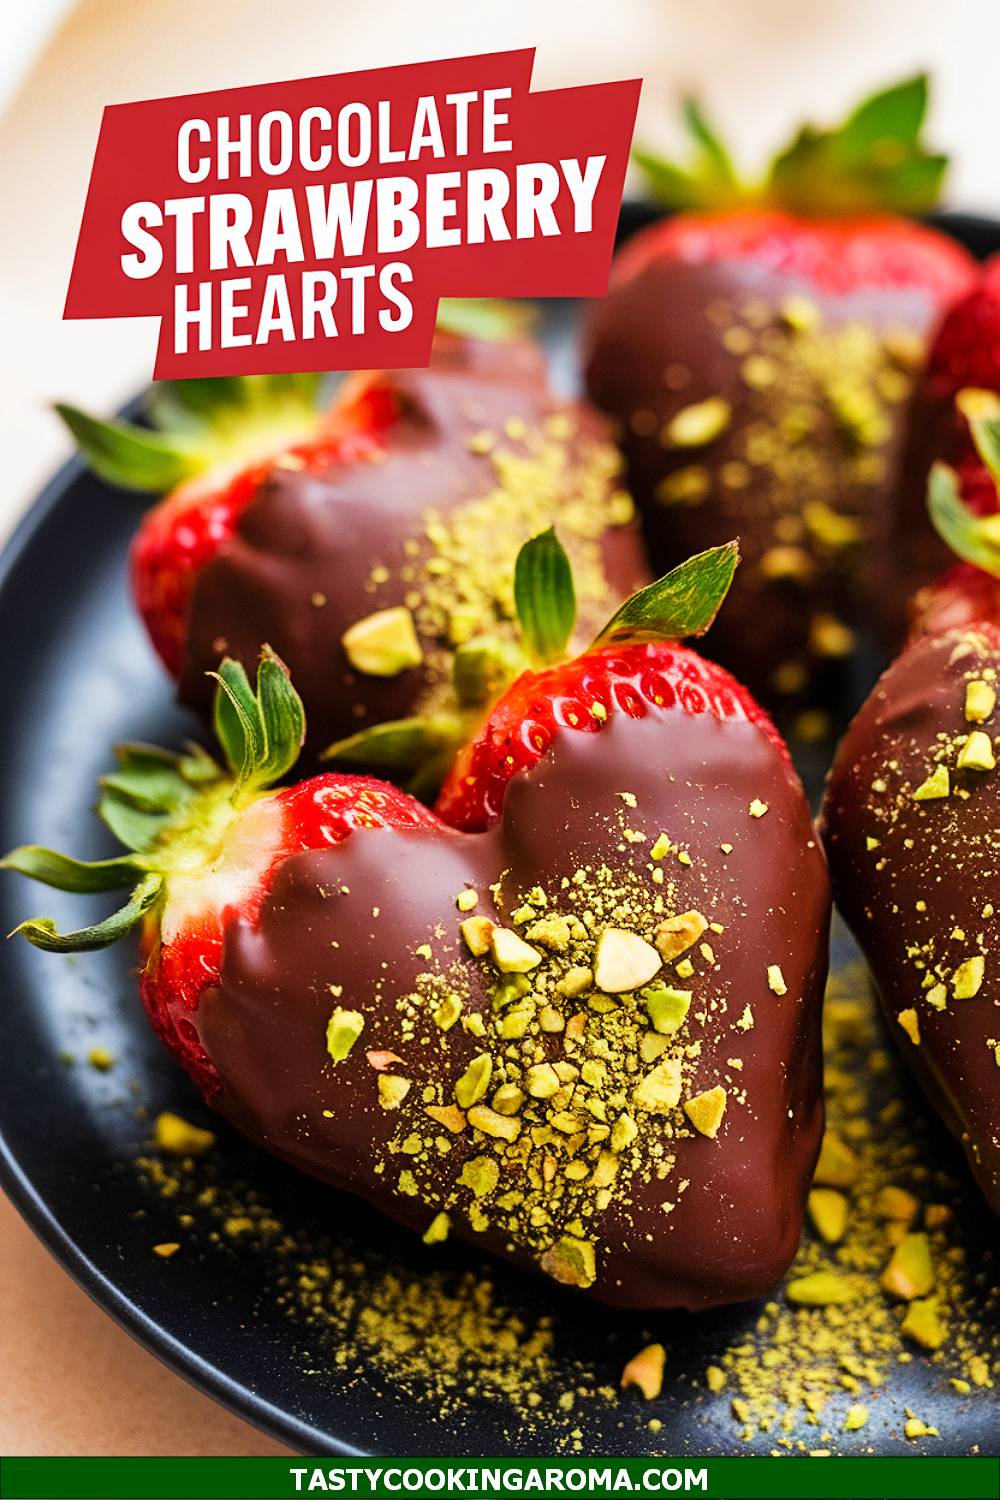
Chocolate-Covered Strawberry Hearts with Pistachio Dust
Chocolate-covered strawberry hearts are a fun twist on the classic Valentine’s treat. These heart-shaped delights feature juicy strawberries coated in rich, melted chocolate and sprinkled with vibrant pistachio dust for a nutty crunch. They’re simple to make yet look so elegant, perfect for impressing your loved ones. Plus, the combination of sweet chocolate, tart strawberries, and salty pistachios is absolutely irresistible!
Serving Size: 8 servings
Time Needed: 25 minutes
Ingredients
- 8 large strawberries
- 1 cup semi-sweet chocolate chips
- 1/4 cup finely crushed pistachios
- 2 teaspoons coconut oil or butter (for smoother chocolate)
Instructions
- Wash the strawberries and pat them completely dry. Slice each strawberry in half lengthwise and trim the tops to create a heart shape.
- Melt the chocolate chips and coconut oil (or butter) in a microwave-safe bowl in 20-second intervals, stirring between each, until smooth and glossy.
- Dip each strawberry heart into the melted chocolate, ensuring it’s evenly coated. Place them on a parchment-lined tray.
- Immediately sprinkle the crushed pistachios over the chocolate before it sets. Let the chocolate harden at room temperature or in the fridge for faster results.
Quick Pros of the Recipe
- Perfect balance of sweet, tart, and salty flavors.
- Requires minimal ingredients and time.
- Looks elegant yet is easy enough for beginners.
- Customizable with other toppings like crushed almonds or coconut flakes.
Ingredient Substitutions or Customization Ideas: You can swap pistachios for crushed hazelnuts, shredded coconut, or even edible gold flakes for a luxurious touch. For a dairy-free option, use vegan chocolate chips.
Cooking Tips and Tricks: Ensure the strawberries are completely dry before dipping to prevent the chocolate from seizing. You can also use a toothpick or fork to dip the strawberries neatly without making a mess.
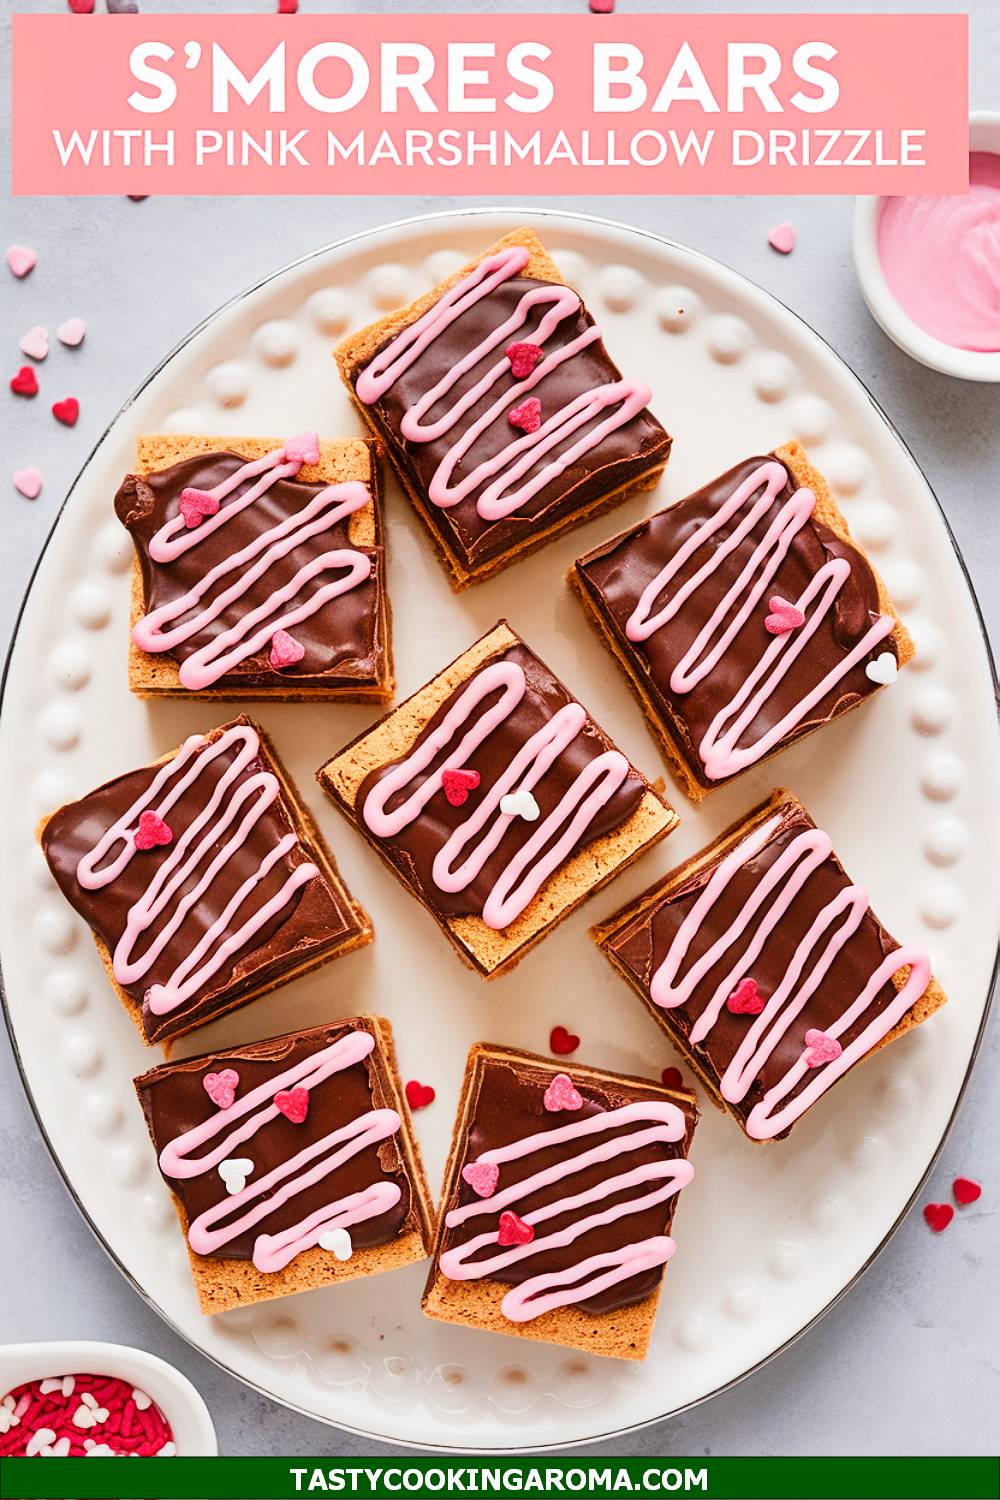
Valentine S’mores Bars with Pink Marshmallow Drizzle
If you love s’mores, this Valentine’s version will steal your heart! These bars feature a graham cracker crust, gooey chocolate layer, and pink marshmallow drizzle that’s as festive as it is delicious. They’re a no-fuss dessert that combines nostalgia with a romantic twist. Perfect for sharing with your special someone or making with kids as a fun Valentine’s activity!
Serving Size: 12 bars
Time Needed: 40 minutes
Ingredients
- 1 1/2 cups graham cracker crumbs
- 1/2 cup melted butter
- 1/4 cup granulated sugar
- 1 1/2 cups semi-sweet chocolate chips
- 2 cups mini marshmallows
- Pink food coloring (optional)
Instructions
- Preheat your oven to 350°F (175°C). Line an 8×8-inch baking pan with parchment paper.
- In a bowl, mix graham cracker crumbs, melted butter, and sugar until combined. Press this mixture firmly into the prepared pan to form the crust.
- Sprinkle the chocolate chips evenly over the crust, then top with mini marshmallows. Bake for 10–12 minutes, or until the marshmallows are golden and puffy.
- For the pink drizzle, melt a handful of marshmallows with a splash of water in the microwave, stirring until smooth. Add a drop of pink food coloring, then drizzle over the cooled bars before slicing.
Quick Pros of the Recipe
- Combines all the flavors of classic s’mores with a festive Valentine’s twist.
- Kid-friendly and fun to make as a family.
- Minimal prep with no complicated steps.
- Perfect for parties or as a sweet snack at home.
Ingredient Substitutions or Customization Ideas: Swap semi-sweet chocolate for milk or dark chocolate, or add a layer of peanut butter for extra richness. For a gluten-free version, use gluten-free graham crackers.
Cooking Tips and Tricks: Press the crust firmly to ensure it holds together when slicing. Let the bars cool completely before cutting to keep the layers intact.
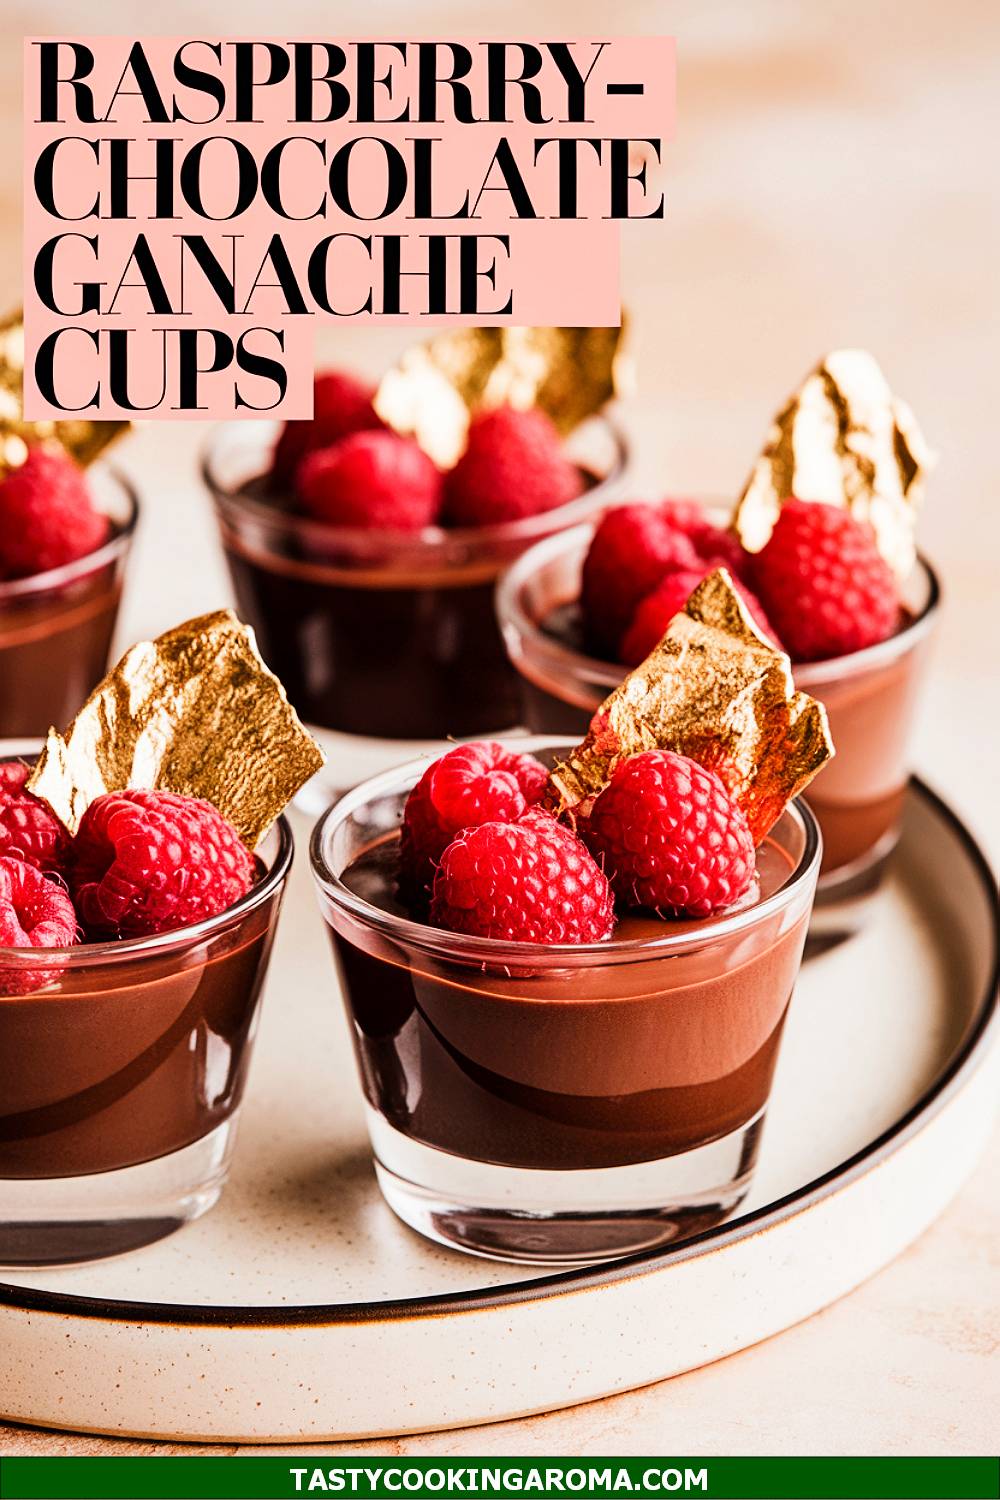
Raspberry-Chocolate Ganache Cups with Gold Leaf
These raspberry-chocolate ganache cups are as luxurious as they sound. Each cup is filled with silky chocolate ganache and topped with a fresh raspberry and edible gold leaf for a touch of elegance. They’re bite-sized, making them perfect for parties or as a romantic after-dinner treat. The rich chocolate paired with the tangy raspberry creates a flavor combo that’s nothing short of magical!
Serving Size: 12 cups
Time Needed: 30 minutes (plus chilling time)
Ingredients
- 12 mini tart shells or chocolate cups
- 1 cup heavy cream
- 8 oz semi-sweet chocolate, finely chopped
- 12 fresh raspberries
- Edible gold leaf (optional)
Instructions
- In a small saucepan, heat the heavy cream over medium heat until it just begins to simmer. Remove from heat and pour over the chopped chocolate in a heatproof bowl.
- Let the mixture sit for 2–3 minutes, then stir until smooth and glossy to create the ganache.
- Spoon the ganache into the mini tart shells or chocolate cups, filling them about 3/4 full. Chill in the refrigerator for 1–2 hours, or until set.
- Top each cup with a fresh raspberry and a small piece of edible gold leaf before serving.
Quick Pros of the Recipe
- Elegant and perfect for special occasions.
- Rich, creamy ganache pairs beautifully with fresh raspberries.
- Bite-sized and easy to serve at parties.
- Customizable with different toppings or flavored ganache.
Ingredient Substitutions or Customization Ideas: Use white chocolate for a sweeter ganache, or add a splash of raspberry liqueur for an adult twist. You can also swap raspberries for strawberries or blackberries.
Cooking Tips and Tricks: Use high-quality chocolate for the ganache to ensure the best flavor. If you don’t have edible gold leaf, a dusting of powdered sugar or cocoa powder works as a beautiful garnish.
FAQ
How can I make these recipes healthier?
To make these recipes more health-conscious, you can substitute refined sugar with natural sweeteners like honey or maple syrup, use whole-grain flours for baked goods, or opt for low-fat dairy alternatives wherever applicable. For example, use Greek yogurt instead of heavy cream in the Rosewater Raspberry Mousse Cups or swap out butter for coconut oil in the Pink Velvet Cinnamon Rolls.
Are the Heart-Shaped Puff Pastry Roses with Strawberry Glaze difficult to prepare?
No, these are surprisingly easy to make! Start with pre-made puff pastry sheets, which eliminate a lot of effort. With simple rolling and arranging techniques, along with a vibrant strawberry glaze made from fresh fruit, they come together beautifully even for beginners looking to wow their Valentine.
What are some kid-friendly dessert ideas from this list?
Many recipes here are perfect for kids, especially the fun and colorful ones! For example, the Valentine S’mores Bars with Pink Marshmallow Drizzle, Sparkling Strawberry Lemonade Jelly Shots (non-alcoholic version), and Cheesecake-Stuffed Strawberries with Oreo Crumble are all great choices for little ones. These desserts are interactive, visually appealing, and easy to enjoy as family-friendly Valentines Bakes For Kids.
Can I prepare any of these desserts ahead of time?
Yes, many of these desserts can be prepared in advance! Desserts like Raspberry-Filled White Chocolate Truffles, Valentine Oreo Truffles, and Rosewater Raspberry Mousse Cups store well in the refrigerator and still retain their freshness and flavor the next day. For baked items like the Pink Velvet Cinnamon Rolls, you can prepare the dough in advance and bake them fresh on the day of your celebration.
What’s the best way to achieve the gooey center in the Strawberry Lava Cakes with Gooey Center?
The key to the perfect gooey center in these Lava Cake recipes lies in precise timing. Bake the cakes just until the outer edges set but the center is still slightly jiggly when touched. Be sure to preheat your oven and check frequently, as even an extra minute or two can transform the runny center into a fully baked cake.
Where can I find the edible flowers for recipes like White Chocolate Matcha Bark with Edible Roses or Chocolate Raspberry Tarts with Floral Garnishes?
Edible flowers are available at specialty grocery stores, farmer’s markets, or online. Ensure that the flowers you purchase are labeled specifically as edible and pesticide-free. Popular edible options like rose petals or pansies work beautifully for desserts with delicate floral touches.
Can I use store-bought components for a shortcut?
Absolutely! Store-bought puff pastry is a great shortcut for recipes like the Mini Puff Pastry Cheesecake Pockets or Heart-Shaped Puff Pastry Roses. Additionally, you can use pre-made chocolate shells for the Raspberry-Chocolate Ganache Cups with Gold Leaf or ready-made graham cracker crusts for the Chocolate Raspberry Tarts with Floral Garnishes. These swaps save time without compromising flavor.
How do I achieve smooth and creamy consistency in my Valentines Raspberry Desserts, like the mousse or truffles?
To ensure a smooth consistency, make sure to properly sift your dry ingredients and melt any chocolate slowly to avoid seizing. When whipping cream or mixing mousse, fold gently to avoid deflating the mixture. For recipes like Raspberry-Filled White Chocolate Truffles, using high-quality ingredients is key for a luxurious texture.
Conclusion
Whether you’re celebrating with your sweetheart, hosting a gathering, or simply treating yourself, these dessert ideas are brimming with festive charm and flavors designed to impress.
From the exquisite Rosewater Raspberry Mousse Cups and indulgent Strawberry Lava Cakes with Gooey Center to kid-friendly favorites like Valentine S’mores Bars with Pink Marshmallow Drizzle, there’s no shortage of Sweet Snacks Recipes to choose from. The versatility of baked goods like Puff Pastry Hearts and easy-to-make treats such as the Chocolate Cherry Almond Bonbons offer something for every level of expertise and preference.
Now that you’ve explored these 18 delightful Valentine dessert ideas, it’s time to roll up your sleeves and create memories in the kitchen! Save this article for future inspiration, share it with your loved ones, and let us know in the comments: Which recipe are you most excited to try?
Whether it’s the romantic charm of Strawberry Filled Chocolates or the playful whimsy of Valentine Tea-inspired bonbons, there’s a perfect treat waiting to add joy to your Valentine’s Day celebration. Happy baking!
