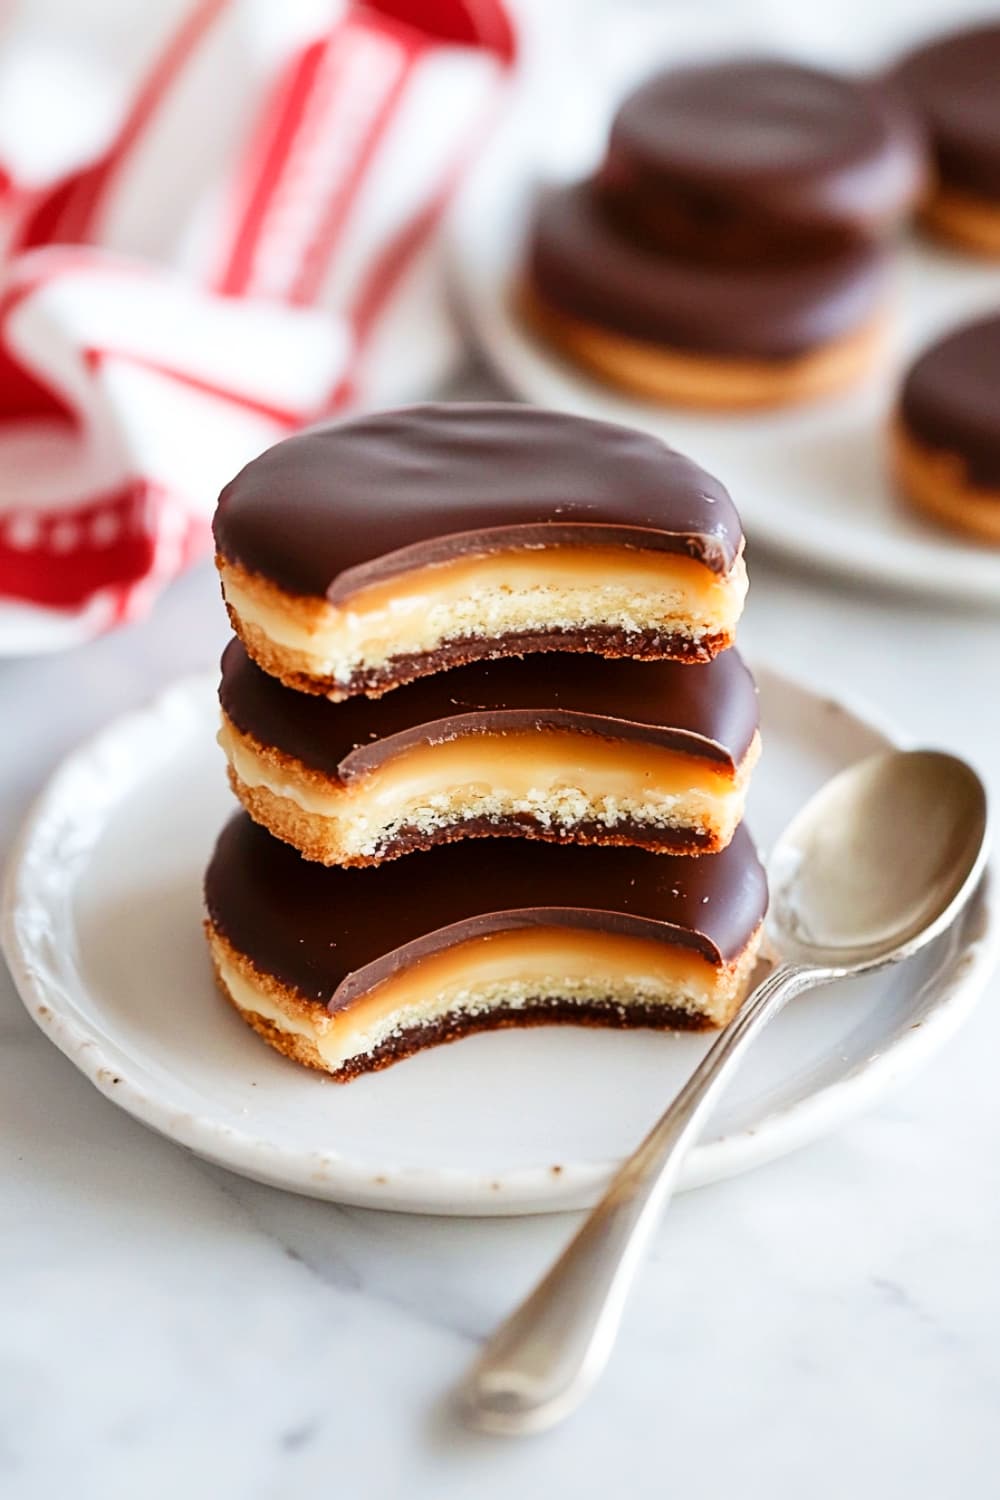
These Chocolate Twix Cookies Are So Addictive, You’ll Want to Bake Them Every Week!

Picture this: you’re curled up with a hot drink, and all you want is that iconic caramel-chocolate crunch of a Twix bar.
Now, imagine transforming that flavor into a soft, chewy cookie. Sounds dreamy, right?
Enter the Chocolate Twix Cookies—the best of both worlds!
With 30 minutes and some pantry staples, you can make these caramel shortbread wonders that taste just like a Twix but with a homemade twist. Let’s be real: who wouldn’t want that?
Why You’ll Love This Recipe:
- Packed with irresistible layers of creamy caramel and chocolate.
- A fun way to recreate your favorite candy bar at home.
- Great for impressing guests at holiday parties or cookie exchanges.
- Can be made as a gluten-free Twix treat with simple swaps!
Twix-Inspired Chocolate Coated Cookies Recipe
- Preparation Time: 25 minutes
- Cooking Time: 12 minutes
- Total Time: 37 minutes
Ingredients:
- Shortbread Base:
- 1 cup all-purpose flour (or gluten-free flour for dietary preferences)
- 1/2 cup unsalted butter (or vegan butter for a dairy-free option)
- 1/4 cup powdered sugar
- 1 tsp vanilla extract
- Caramel Layer:
- 1/2 cup soft caramel candies (or dairy-free caramels for allergies)
- 2 tbsp heavy cream (or coconut milk for dairy-free alternative)
- Chocolate Topping:
- 1 cup semi-sweet chocolate chips (or dairy-free chocolate chips)
- 1 tbsp coconut oil
Instructions:
1. Prepare the Shortbread Base:
- Preheat your oven to 350°F (175°C). Line a baking sheet with parchment paper.
- In a mixing bowl, cream together the butter and sugar until smooth. Add vanilla extract and mix.
- Gradually add in the flour until the dough forms. Roll out the dough to about 1/4-inch thickness and use a round cookie cutter to cut out cookie shapes.
- Place cookies on the prepared baking sheet and bake for 10-12 minutes or until golden around the edges. Let them cool completely.
2. Make the Caramel Layer:
- While the cookies are cooling, melt the caramel candies with heavy cream (or coconut milk for dairy-free) in a microwave-safe bowl in 30-second intervals, stirring in between until smooth.
- Once the cookies have cooled, spoon a thin layer of melted caramel over each cookie, spreading it evenly. Place in the fridge to set for 10-15 minutes.
3. Coat with Chocolate:
- Melt the chocolate chips with coconut oil in a microwave-safe bowl in 20-second intervals, stirring in between until fully melted.
- Dip each cookie (caramel side up) into the melted chocolate, ensuring the caramel is fully covered. Let any excess chocolate drip off and place the cookies back on the parchment-lined tray.
- Allow the chocolate to set completely in the fridge for about 15 minutes.
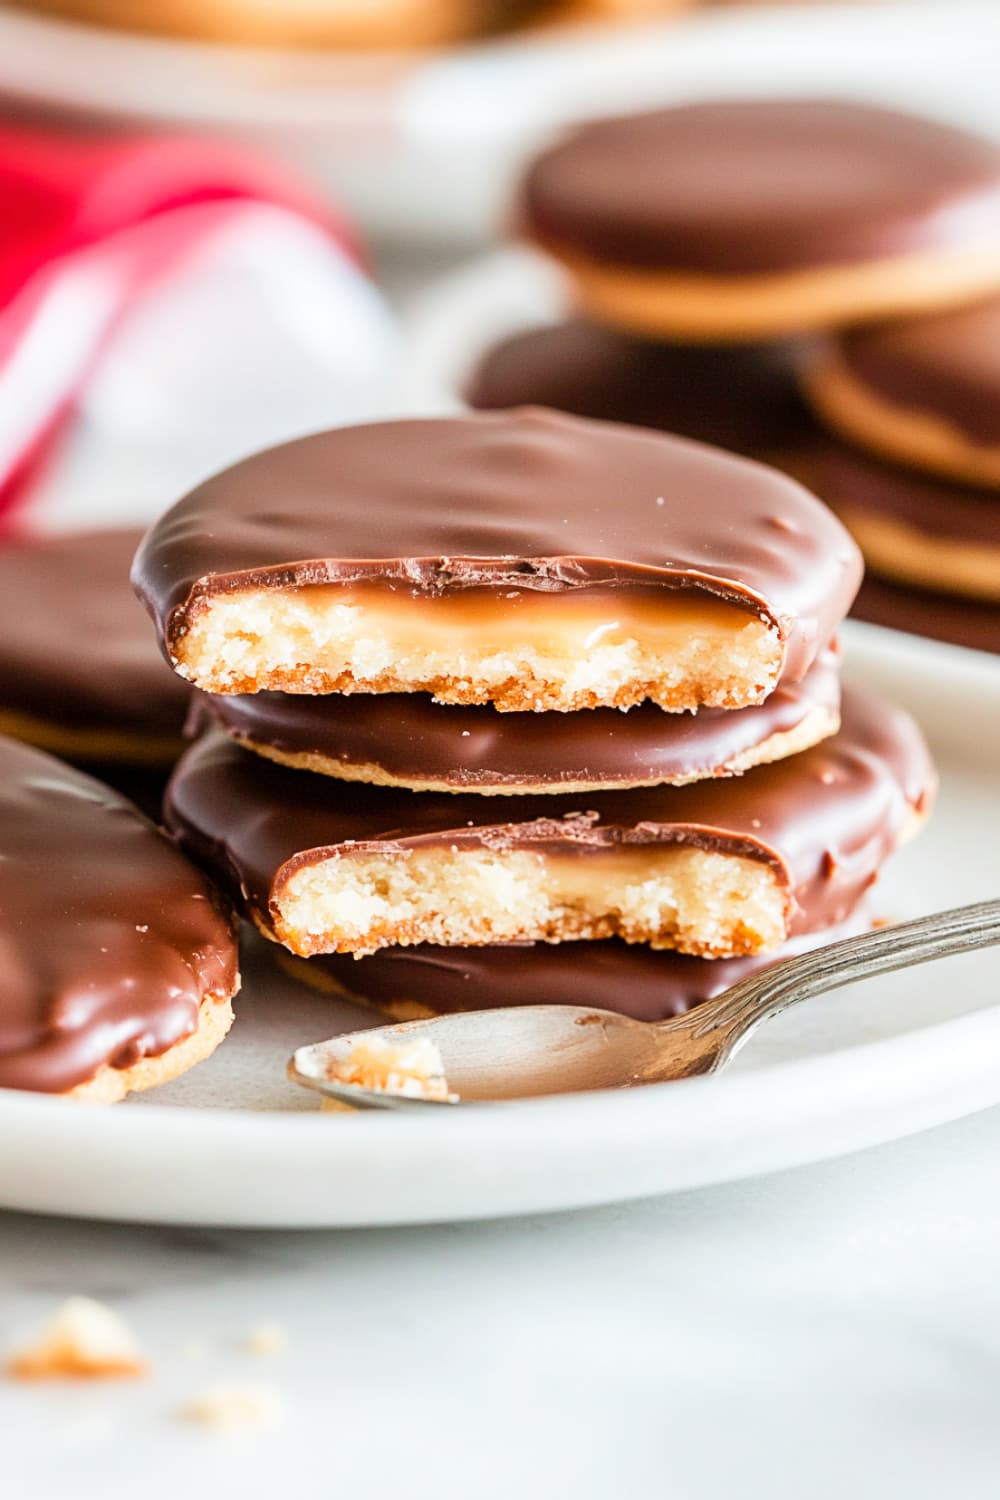
4. Decorating Options:
- Drizzle extra melted white chocolate or dark chocolate on top for a decorative effect.
- Sprinkle sea salt or edible gold dust for an elegant finish.
- Top with chopped nuts or festive sprinkles to suit holiday or party themes.
Notes:
- Allergy Substitutes: Swap regular butter with vegan butter and heavy cream with coconut milk for a dairy-free version.
- Storage Tip: Store the cookies in an airtight container at room temperature for up to a week or in the refrigerator for longer freshness.
Additional Tips and Instructions:
- Dough Thickness: It might be helpful to emphasize that the dough should be rolled out to exactly 1/4 inch thickness to ensure uniform cookie size and even baking.
- Chilling the Cookies: After spreading the caramel layer, suggest refrigerating the cookies for a minimum of 20 minutes (instead of 10-15) to ensure the caramel sets well before dipping them in chocolate. This helps avoid the caramel melting into the chocolate.
- Chocolate Dripping: When dipping the cookies in chocolate, encourage readers to gently tap the dipped cookie against the bowl to shake off excess chocolate for a clean finish.
Garnishing & Decoration Options:
- Edible Glitter or Gold Leaf:
- Why it works: Sprinkling edible glitter or using small gold leaf sheets on the chocolate topping gives the cookies a luxurious, Pinterest-worthy appearance that feels festive and special.
- Colorful Drizzles:
- Why it works: Create colorful contrast by drizzling white chocolate or colored candy melts over the dark chocolate. Red or green drizzles would be perfect for Christmas-themed Twix cookies.
- Holiday Sprinkles:
- Why it works: Adding themed sprinkles such as stars, snowflakes, or multicolored round sprinkles will make the cookies eye-catching and festive, ideal for holiday gatherings or parties.
- Sea Salt Flakes:
- Why it works: A sprinkle of sea salt flakes on top of the chocolate before it sets will provide a trendy salty-sweet combination and offer visual appeal.
- Chocolate Shavings:
- Why it works: For an elegant finish, top the cookies with fine chocolate shavings, either dark or white chocolate, to give them a refined and decadent look.
Mistakes to Avoid While Making Twix-Inspired Chocolate Coated Cookies:
- Ingredient Selection:
- Common Mistake: Substituting margarine for butter may result in softer cookies.
- Tip: Always use unsalted butter or high-quality dairy-free alternatives for the right texture and flavor.
- Preparation Pitfalls:
- Common Mistake: Rolling the dough too thick or thin can lead to uneven baking.
- Tip: Maintain a consistent thickness of 1/4 inch to ensure even cooking and avoid burning the edges.
- Cooking Techniques:
- Common Mistake: Overcooking the shortbread can make it too hard and dry.
- Tip: Bake until just golden at the edges, and allow to cool properly before adding the caramel.
- Seasoning and Flavoring:
- Common Mistake: Not adding enough vanilla extract or using low-quality caramel.
- Tip: Use pure vanilla extract and high-quality caramel candies for the best flavor.
- Presentation Tips:
- Common Mistake: Rushing through the dipping process, resulting in uneven chocolate coverage.
- Tip: Let the caramel set properly in the fridge before dipping, and tap off excess chocolate to achieve a smooth finish.
Pairing Suggestions & Seasonal Variations:
- Pairing Suggestions:
- Enjoy these cookies with a cup of hot cocoa or a latte for the perfect indulgent treat.
- For a summer twist, pair with a scoop of vanilla ice cream.
- Seasonal Variations:
- Winter: Add festive holiday sprinkles for a Christmas twist or dust with edible glitter.
- Summer: Use white chocolate and drizzle with fruit-flavored syrups like raspberry for a summery feel.
Pro Tips for Making Twix-Inspired Chocolate Coated Cookies
- Shortbread Perfection:
- Tip: For an extra crisp shortbread base, chill the dough in the refrigerator for 30 minutes before baking. This prevents the cookies from spreading too much and ensures they hold their shape.
- Alternative: If you prefer a softer base, add a tablespoon of cornstarch to the flour mixture. This results in a more tender shortbread.
- Caramel Consistency:
- Tip: Don’t overheat the caramel, as it can become too hard to bite into once cooled. Use a low heat when melting and stir constantly. If it starts to harden too quickly, stir in a splash of cream to keep it smooth.
- Alternative: If you prefer homemade caramel, cook sugar, cream, and butter until it reaches a soft-ball stage (235°F–240°F). This gives a more authentic flavor and consistency.
- Chocolate Coating:
- Tip: To ensure a glossy and smooth chocolate coating, temper the chocolate. If you’re short on time, simply add a teaspoon of coconut oil while melting the chocolate to achieve a nice shine.
- Alternative: Use a mixture of semi-sweet and dark chocolate for a more sophisticated flavor. You can also use dairy-free chocolate if you need a Gluten-Free Twix option.
- Presentation:
- Tip: For picture-perfect cookies, allow the caramel layer to set completely before dipping in chocolate. You can also drizzle some white chocolate on top for contrast or add Christmas Cookie Recipes sprinkles for a festive look.

FAQs
- Can I make these cookies gluten-free?
- Answer: Yes! Simply substitute the all-purpose flour with a gluten-free baking flour blend. Ensure that all other ingredients, especially the caramel candies and chocolate, are labeled gluten-free.
- How do I store the cookies?
- Answer: Store the cookies in an airtight container at room temperature for up to 5 days. If you prefer a firmer texture, refrigerate them, but let them come to room temperature before eating.
- Can I use homemade caramel instead of store-bought?
- Answer: Absolutely! Homemade caramel gives these cookies a more authentic and rich flavor. Just ensure the caramel is cooled slightly but still spreadable when applying it to the cookies.
- Can I freeze these cookies?
- Answer: Yes, you can freeze the cookies before or after dipping them in chocolate. For best results, place them in an airtight container with parchment paper between layers. Defrost in the fridge overnight before serving.
- Can I make this recipe dairy-free?
- Answer: Yes! Use dairy-free butter for the shortbread, coconut milk for the caramel, and dairy-free chocolate for the coating to create a delicious dairy-free alternative.
Closing Thoughts:
I hope you find this Homemade Twix Cookies recipe as delightful to make as it is to eat. It’s a satisfying blend of rich chocolate, creamy caramel, and buttery shortbread that’s sure to impress at any gathering or Christmas Cookie Recipes exchange.
Whether you’re making these for a Twix Bar inspired treat or just a fun twist on a classic, these cookies are a winner every time.
Don’t forget to share your creations with friends and family, or let us know how it turned out in the comments below.
We’d love to see your version and hear about any unique twists or substitutions you tried! Let’s make baking fun, simple, and stress-free. Enjoy!

Twix-inspired chocolate coated cookies
Ingredients
- 1 cup 2 sticks unsalted butter, softened
- 1/2 cup sugar
- 1 tsp vanilla extract
- 2 cups all-purpose flour or gluten-free flour
- 1/2 cup caramel candies
- 2 tbsp heavy cream or coconut milk for dairy-free
- 1 cup semi-sweet chocolate chips or dairy-free alternative
- 1 tbsp coconut oil optional for a glossy finish
- Sprinkles and chocolate syrup
Instructions
- Preheat Oven: Preheat to 350°F (175°C). Line a baking sheet with parchment paper.
- Prepare Shortbread: Cream together butter, sugar, and vanilla. Gradually add flour and mix until dough forms. Roll out dough to 1/4 inch thickness and cut into rounds. Place on the prepared baking sheet.
- Bake: Bake for 10-12 minutes, or until edges are golden. Let cool.
- Make Caramel Layer: Melt caramel candies and cream in the microwave, stirring every 30 seconds until smooth. Spread a layer of caramel on each cooled cookie.
- Chill: Refrigerate cookies for 20 minutes to set the caramel.
- Melt Chocolate: Melt chocolate chips and coconut oil (if using) in the microwave in 30-second intervals until smooth. Dip each cookie into the melted chocolate and let excess drip off.
- Set: Let the cookies set on parchment paper. You can refrigerate them for faster setting.
- Serving: Serve once chocolate is fully set and firm.


